In this short tutorial we will learn how to install MongoDB on Ubuntu 22.04 Linux operating system. We will install MongoDB 6.0 Community Edition on LTS (long-term support) releases of Ubuntu Linux using the apt package manager. Hopefully this tutorial can help provide understanding for novice users to install MongoDB in their respective environments as a means of learning one of the most popular NoSQL databases today.
MongoDB Installation On Ubuntu 22.04
We will installs MongoDB 6.0 Community Edition on Linux Ubuntu 22.04 LTS operating system. MongoDB 6.0 is the last stable version of MongoDB which was released on 19 August 2022. We will use the apt package manager for this installation. There are several steps to install MongoDB Community Edition as mentioned below.
- Import MongoDB public key
- Create a list file for MongoDB.
- Reload local package database.
- Install MongoDB packages.
- Running MongoDB
- Using MongoDB
The detailed tasks will be explained in the sub-chapter below.
1. Import MongoDB Public Key
In this stage, we will import the MongoDB 6.0 Community edition public key used by the package management system. This task is done by submitting command line :
wget -qO - https://www.mongodb.org/static/pgp/server-6.0.asc | sudo apt-key add -
Output :
ramans@infodiginet:~$ wget -qO - https://www.mongodb.org/static/pgp/server-6.0.asc | sudo apt-key add -
Warning: apt-key is deprecated. Manage keyring files in trusted.gpg.d instead (see apt-key(8)).
OK
2. Create MongoDB List File
At this stage, we will create the list file, called as /etc/apt/sources.list.d/mongodb-org-6.0.list for your version of Ubuntu. By using touch command line we will create this file, and add a new line as follow :
$ sudo touch /etc/apt/sources.list.d/mongodb-org-6.0.list
Output :
ramans@infodiginet:~$ sudo touch /etc/apt/sources.list.d/mongodb-org-6.0.list
ramans@infodiginet:~$ echo "deb [ arch=amd64,arm64 ] https://repo.mongodb.org/apt/ubuntu jammy/mongodb-org/6.0 multiverse" | sudo tee /etc/apt/sources.list.d/mongodb-org-6.0.list
3. Reload Local Package Database
To take effect of new package, we will reload the local package repository by submitting command line :
$ sudo apt-get update
Output :
ramans@infodiginet:~$ sudo apt-get update
Hit:1 http://id.archive.ubuntu.com/ubuntu jammy InRelease
Ign:2 http://download.webmin.com/download/repository sarge InRelease
Get:3 http://id.archive.ubuntu.com/ubuntu jammy-updates InRelease [114 kB]
Hit:4 http://download.webmin.com/download/repository sarge Release
Ign:6 https://repo.mongodb.org/apt/ubuntu jammy/mongodb-org/6.0 InRelease
Hit:7 https://repos.influxdata.com/ubuntu jammy InRelease
Get:8 http://security.ubuntu.com/ubuntu jammy-security InRelease [110 kB]
Get:9 https://repo.mongodb.org/apt/ubuntu jammy/mongodb-org/6.0 Release [4.414 B]
Get:10 http://id.archive.ubuntu.com/ubuntu jammy-backports InRelease [99,8 kB]
Get:11 https://repo.mongodb.org/apt/ubuntu jammy/mongodb-org/6.0 Release.gpg [801 B]
Ign:12 http://id.archive.ubuntu.com/ubuntu jammy-updates/main i386 Packages
Ign:13 http://id.archive.ubuntu.com/ubuntu jammy-updates/main amd64 Packages
Get:14 http://id.archive.ubuntu.com/ubuntu jammy-updates/main Translation-en [169 kB]
Get:15 http://id.archive.ubuntu.com/ubuntu jammy-updates/main amd64 DEP-11 Metadata [94,9 kB]
Get:16 http://id.archive.ubuntu.com/ubuntu jammy-updates/main amd64 c-n-f Metadata [11,4 kB]
Ign:17 http://id.archive.ubuntu.com/ubuntu jammy-updates/universe amd64 Packages
Ign:18 http://id.archive.ubuntu.com/ubuntu jammy-updates/universe i386 Packages
Get:19 http://id.archive.ubuntu.com/ubuntu jammy-updates/universe amd64 DEP-11 Metadata [257 kB]
Get:20 https://repo.mongodb.org/apt/ubuntu jammy/mongodb-org/6.0/multiverse arm64 Packages [5.438 B]
Get:21 http://id.archive.ubuntu.com/ubuntu jammy-updates/universe amd64 c-n-f Metadata [14,0 kB]
Get:22 http://id.archive.ubuntu.com/ubuntu jammy-updates/multiverse amd64 DEP-11 Metadata [940 B]
Get:23 http://id.archive.ubuntu.com/ubuntu jammy-backports/universe amd64 DEP-11 Metadata [11,7 kB]
Get:12 http://id.archive.ubuntu.com/ubuntu jammy-updates/main i386 Packages [390 kB]
Get:13 http://id.archive.ubuntu.com/ubuntu jammy-updates/main amd64 Packages [756 kB]
Get:24 https://repo.mongodb.org/apt/ubuntu jammy/mongodb-org/6.0/multiverse amd64 Packages [6.277 B]
Get:17 http://id.archive.ubuntu.com/ubuntu jammy-updates/universe amd64 Packages [761 kB]
Get:18 http://id.archive.ubuntu.com/ubuntu jammy-updates/universe i386 Packages [555 kB]
Fetched 3.362 kB in 7s (454 kB/s)
Reading package lists... Done
4. Install MongoDB Packages
After all are set, then this is the time to install MongoDB 6.0 Community edition by submitting command line :
$ sudo apt-get install -y mongodb-org
Output :
ramans@infodiginet:~$ sudo apt-get install -y mongodb-org
Reading package lists... Done
Building dependency tree... Done
Reading state information... Done
The following additional packages will be installed:
  mongodb-database-tools mongodb-mongosh mongodb-org-database mongodb-org-database-tools-extra
  mongodb-org-mongos mongodb-org-server mongodb-org-shell mongodb-org-tools
The following NEW packages will be installed:
  mongodb-database-tools mongodb-mongosh mongodb-org mongodb-org-database
  mongodb-org-database-tools-extra mongodb-org-mongos mongodb-org-server mongodb-org-shell
  mongodb-org-tools
0 upgraded, 9 newly installed, 0 to remove and 7 not upgraded.
Need to get 139 MB of archives.
After this operation, 464 MB of additional disk space will be used.
. . .
Setting up mongodb-org-shell (6.0.3) ...
Setting up mongodb-database-tools (100.6.1) ...
Setting up mongodb-org-mongos (6.0.3) ...
Setting up mongodb-org-database-tools-extra (6.0.3) ...
Setting up mongodb-org-database (6.0.3) ...
Setting up mongodb-org-tools (6.0.3) ...
Setting up mongodb-org (6.0.3) ...
Processing triggers for man-db (2.10.2-1) ...
5. Running MongoDB 6.0 Community Edition
By default, MongoDB runs using the mongodb user account, and the data directory /var/lib/mongodb and the log directory /var/log/mongodb are created during the installation.
5.1. Start MongoDB
We can start MongoDB service by submitting the following command:
$ sudo systemctl start mongod
5.2. Verify that MongoDB
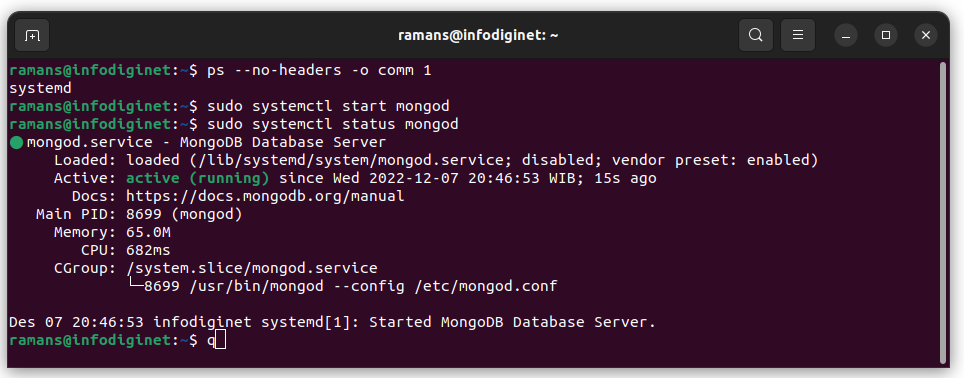
We will verify if MongoDB has started successfully, by issuing command line :
$ sudo systemctl status mongod
Output :
ramans@infodiginet:~$ sudo systemctl status mongod
● mongod.service - MongoDB Database Server
     Loaded: loaded (/lib/systemd/system/mongod.service; disabled; vendor preset: enabled)
     Active: active (running) since Wed 2022-12-07 20:46:53 WIB; 15s ago
       Docs: https://docs.mongodb.org/manual
   Main PID: 8699 (mongod)
     Memory: 65.0M
        CPU: 682ms
     CGroup: /system.slice/mongod.service
             └─8699 /usr/bin/mongod --config /etc/mongod.conf

Des 07 20:46:53 infodiginet systemd[1]: Started MongoDB Database Server.
We can optionally ensure if MongoDB will start following a system reboot by submitting the following command:
$ sudo systemctl enable mongod
Output :
ramans@infodiginet:~$ sudo systemctl enable mongod
Created symlink /etc/systemd/system/multi-user.target.wants/mongod.service → /lib/systemd/system/mongod.service.
5.3. Stop MongoDB
To stop MongoDB service we will use this command line :
$ sudo systemctl stop mongod
5.4. Restart MongoDB
To restart MongoDB service, we will submit the command line :
$ sudo systemctl restart mongod
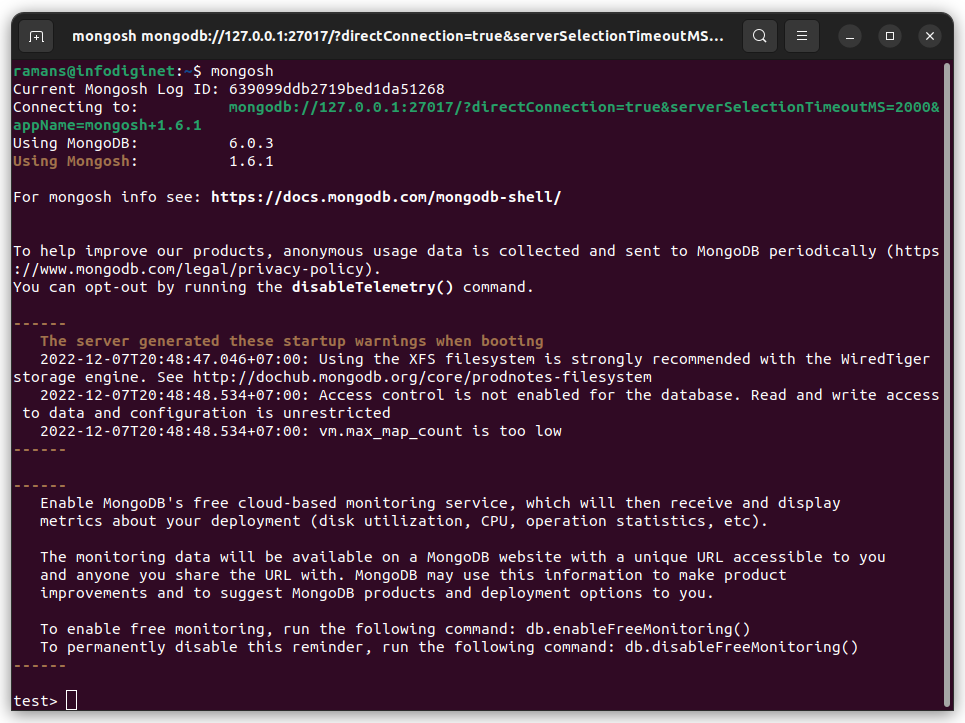
6. Using MongoDB
To use MongoDB we will use mongosh command line tools. Start a mongosh session on the same host machine as the mongod. We can run mongosh without any command-line options to connect to a mongod that is running on your localhost with default port 27017.
$ mongosh
Output :
ramans@infodiginet:~$ mongosh
Current Mongosh Log ID:	639099ddb2719bed1da51268
Connecting to:		mongodb://127.0.0.1:27017/?directConnection=true&serverSelectionTimeoutMS=2000&appName=mongosh+1.6.1
Using MongoDB:		6.0.3
Using Mongosh:		1.6.1

For mongosh info see: https://docs.mongodb.com/mongodb-shell/


To help improve our products, anonymous usage data is collected and sent to MongoDB periodically (https://www.mongodb.com/legal/privacy-policy).
You can opt-out by running the disableTelemetry() command.

------
   The server generated these startup warnings when booting
   2022-12-07T20:48:47.046+07:00: Using the XFS filesystem is strongly recommended with the WiredTiger storage engine. See http://dochub.mongodb.org/core/prodnotes-filesystem
   2022-12-07T20:48:48.534+07:00: Access control is not enabled for the database. Read and write access to data and configuration is unrestricted
   2022-12-07T20:48:48.534+07:00: vm.max_map_count is too low
------

------
   Enable MongoDB's free cloud-based monitoring service, which will then receive and display
   metrics about your deployment (disk utilization, CPU, operation statistics, etc).

   The monitoring data will be available on a MongoDB website with a unique URL accessible to you
   and anyone you share the URL with. MongoDB may use this information to make product
   improvements and to suggest MongoDB products and deployment options to you.

   To enable free monitoring, run the following command: db.enableFreeMonitoring()
   To permanently disable this reminder, run the following command: db.disableFreeMonitoring()
------

test>
On mongosh interactive console, we can try to use MongoDB by executing CRUD operation.
Conclusion
In this tutorial, we have learned how to install MongoDB 6.0 Community Edition on Ubuntu 22.04 Linux operating system. I hope this short tutorial will be helpful.