In this short tutorial, we will learn how to install Apache Maven version 3.8.6 on Ubuntu 20.04 Linux operating system. Apache Maven is a software project management and build automation tool used primarily for Java projects. Maven can also be used to build and manage projects written in C#, Ruby, Scala, and other languages. The Maven project is hosted by the Apache Software Foundation, where it was formerly part of the Jakarta Project.
In this tutorial we will use Apache Maven version 3.8.6 which was released on 06 June 2022. Apache Maven 3.8.6 is the latest release and recommended version for all users.
Apache Maven 3.8.6 Installation On Ubuntu 20.04
Prerequisites
Before we start the Apache Maven installation process, there are several prerequisites that must be met so that the installation process can run smoothly. We will need to prepare any requirements as mention below :
- Java Development Kit (JDK) Maven 3.3+ require JDK 1.7
- Ubuntu 20.04 system with disk capacity about 500MB
- User account with sudo privilege.
Apache Maven 3.3+ requires JDK 1.7 or above to execute, we will ensure the java has been installed on the system by querying its version. If there is no java installed on our system then we must install it before continuing the next process.
$ java -version
Output :
[ramans@otodiginet ~]$ java -version
openjdk version "11.0.8" 2020-07-14 LTS
OpenJDK Runtime Environment 18.9 (build 11.0.8+10-LTS)
OpenJDK 64-Bit Server VM 18.9 (build 11.0.8+10-LTS, mixed mode, sharing)
We have had java 11 installed on the system.
The Apache Maven 3.8.6 installation on Ubuntu 20.04 steps will be described on several steps.
- Update Ubuntu System
- Download Maven source and extract files
- Set up environment variables
- Verify Apache Maven Installation
The details of installation will be detail discussed below.
1. Update Ubuntu System
The first step of Apache Maven installation is to update local packages software. This task will cut down the installation time and it also helps prevent zero-day exploits against outdated software. We will use command line :
$ sudo apt update
$ sudo apt upgrade
2. Download Maven Source and Unpack
The first step to install Apache Maven is to download the source files from the Maven official website. By using wget command line, we will download the Apache Maven source file. In this tutorial, we will use Apache Maven versin 3.8.6.
After download Maven 3.8.6 source then we will extract it to /opt directory.
$ wget https://downloads.apache.org/maven/maven-3/3.8.6/binaries/apache-maven-3.8.6-bin.tar.gz
$ sudo tar xf apache-maven-3.8.6-bin.tar.gz -C /opt
$ sudo ln -s /opt/apache-maven-3.6.3 /opt/maven
Output :
ramans@infodiginet:~$ wget https://downloads.apache.org/maven/maven-3/3.8.6/binaries/apache-maven-3.8.6-bin.tar.gz
--2022-12-14 16:01:16--  https://downloads.apache.org/maven/maven-3/3.8.6/binaries/apache-maven-3.8.6-bin.tar.gz
Resolving downloads.apache.org (downloads.apache.org)... 88.99.95.219, 135.181.214.104, 2a01:4f8:10a:201a::2, ...
Connecting to downloads.apache.org (downloads.apache.org)|88.99.95.219|:443... connected.
HTTP request sent, awaiting response... 200 OK
Length: 8676320 (8.3M) [application/x-gzip]
Saving to: ‘apache-maven-3.8.6-bin.tar.gz’

apache-maven-3.8.6-bin.tar.g 100%[==============================================>]   8.27M   419KB/s    in 16s

2022-12-14 16:01:34 (518 KB/s) - ‘apache-maven-3.8.6-bin.tar.gz’ saved [8676320/8676320]
rramans@infodiginet:~$ sudo tar xf apache-maven-3.8.6-bin.tar.gz -C /opt
ramans@infodiginet:~$ cd /opt
ramans@infodiginet:/opt$ ls
apache-maven-3.8.6
ramans@infodiginet:/opt$ cd apache-maven-3.8.6/
ramans@infodiginet:/opt/apache-maven-3.8.6$ ls
bin  boot  conf  lib  LICENSE  NOTICE  README.txt
ramans@infodiginet:/opt/apache-maven-3.8.6$ sudo ln -s /opt/apache-maven-3.6.3 /opt/maven
Then we will move it to the /opt directory.
3. Set up Environment Variables
On this step, we will set the environment variables for Maven by creating a maven.sh file under /etc/profile.d/ directory. We will add the following line.
$ sudo vi /etc/profile.d/maven.sh
export JAVA_HOME=/usr/lib/jvm/java-11-openjdk-amd64
export M2_HOME=/opt/apache-maven-3.8.6
export MAVEN_HOME=/opt/apache-maven-3.8.6
export PATH=${M2_HOME}/bin:${PATH}
Then we will update its mode tobe executbale file.
Output :
ramans@infodiginet:/opt/apache-maven-3.8.6$ sudo vi /etc/profile.d/maven.sh
ramans@infodiginet:/opt/apache-maven-3.8.6$ sudo chmod +x /etc/profile.d/maven.sh
ramans@infodiginet:/opt/apache-maven-3.8.6$ source /etc/profile.d/maven.sh
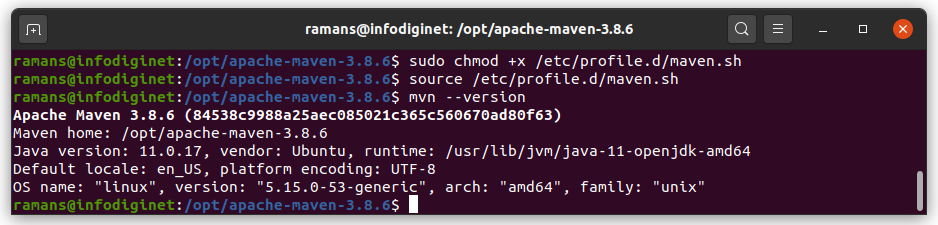
4. Verify Apache Maven Installation
The final steps is to check whether the Apache Maven3.8.6 has been successfully configured on Ubuntu 20.04 system. For this purpose we will use the following command.
$ mvn --version
Output :
ramans@infodiginet:/opt/apache-maven-3.8.6$ mvn --version
Apache Maven 3.8.6 (84538c9988a25aec085021c365c560670ad80f63)
Maven home: /opt/apache-maven-3.8.6
Java version: 11.0.17, vendor: Ubuntu, runtime: /usr/lib/jvm/java-11-openjdk-amd64
Default locale: en_US, platform encoding: UTF-8
OS name: "linux", version: "5.15.0-53-generic", arch: "amd64", family: "unix"
Conclusion
In this short tutorial, we have learned how to install Apache Maven version 3.8.6 on Ubuntu 20.04 LTS operating system successfully. I hope this tutorial will be helpful.