In this article we will learn how to install Apache Kafka On Rocky Linux 8 operating system.
Introduction
In the era of real-time data processing and analytics, Apache Kafka has emerged as a powerful distributed streaming platform. It provides a scalable, fault-tolerant, and high-performance solution for handling real-time data streams. In this article, we will delve into what Apache Kafka is, its architecture, key concepts, and use cases that make it one of the most popular choices for handling data streams.
What is Apache Kafka?
Apache Kafka, developed by the Apache Software Foundation, is an open-source distributed streaming platform. It was originally created by LinkedIn and later contributed to the Apache community. Kafka is designed to handle high-throughput, real-time data streams, making it ideal for use cases such as data integration, event sourcing, log aggregation, and real-time analytics.
Key Concepts in Apache Kafka:
- Topics: In Kafka, data is organized into topics, which act as a feed of messages. Producers publish data to topics, and consumers subscribe to topics to receive and process the data.
- Producers: Producers are applications that write data to Kafka topics. They are responsible for sending data records to Kafka brokers.
- Brokers: Brokers are the servers that manage the topics and handle message storage and replication. They form the Kafka cluster.
- Consumers: Consumers are applications that read data from Kafka topics. They process the data in real-time or store it in external systems.
- Partitions: Kafka topics can be divided into multiple partitions, which allow for parallel processing and data distribution across brokers.
- Replication: Kafka supports data replication to ensure fault tolerance. Each topic’s partitions can have one or more replicas to provide redundancy.
How To Install Apache Kafka On Rocky Linux 8 Step by Step Guide
Installing Apache Kafka on Rocky Linux is a straightforward process. At the time this article was written, the stable version of Apache Kafka was version 3.5.0, so we used this version of Apache Kafka for our training purpose. Follow the steps below to set up Kafka on our system.
Step 1: Download Apache Kafka
Step 2: Extract the Kafka Archive and Move It To the Directory
Step 3: Create Systemd service file for Zookeeper and Kafka
Step 4: Testing Apache Kafka (Creating Kafka Topic)
Prerequisites
Before installing Apache Kafka, ensure you have the following prerequisites:
- Rocky Linux 8 sytem installed.
- Java Development Kit (JDK) 8 or later installed on your system.
- ZooKeeper installed and running, as Kafka relies on ZooKeeper for coordination.
We have Java installed on our system, to ensure we will check it by using command line :
$ java -- version
Output :
[ramansah@infodiginet ~]$ java --version
java 16.0.2 2021-07-20
Java(TM) SE Runtime Environment (build 16.0.2+7-67)
Java HotSpot(TM) 64-Bit Server VM (build 16.0.2+7-67, mixed mode, sharing)
Apache Kafka Installation Process
Step 1: Download Apache Kafka
Visit the Apache Kafka website (https://kafka.apache.org/downloads) and download the latest stable version of Kafka. We will download Kafka version 3.5.0, by submitting command line :
$ wget https://dlcdn.apache.org/kafka/3.5.0/kafka_2.13-3.5.0.tgz
Output :
[ramansah@infodiginet ~]$ wget https://dlcdn.apache.org/kafka/3.5.0/kafka_2.13-3.5.0.tgz
--2023-07-24 10:11:39--  https://dlcdn.apache.org/kafka/3.5.0/kafka_2.13-3.5.0.tgz
Resolving dlcdn.apache.org (dlcdn.apache.org)... 151.101.2.132
Connecting to dlcdn.apache.org (dlcdn.apache.org)|151.101.2.132|:443... connected.
HTTP request sent, awaiting response... 200 OK
Length: 106792776 (102M) [application/x-gzip]
Saving to: ‘kafka_2.13-3.5.0.tgz’

kafka_2.13-3.5.0.tgz         100%[==============================================>] 101.84M  1.44MB/s    in 92s

2023-07-24 10:13:12 (1.11 MB/s) - ‘kafka_2.13-3.5.0.tgz’ saved [106792776/106792776]
Step 2: Extract the Kafka Archive And Move To The Directory
Navigate to the directory where you downloaded the Kafka archive and extract it using the following command:
$ sudo mkdir /usr/local/kafka
$ tar -xvzf kafka_2.13-3.5.0.tgz
$ sudo mv kafka_2.13-3.5.0 /usr/local/kafka
Step 3: Create Systemd service File for Zookeeper and Kafka
At this stage we will create a systemd service file to manage and run both Zookeeper and Kafka in the background. For this purpose we will create two files : /etc/systemd/system/zookeeper.service and /etc/systemd/system/kafka.service.
1. Zookeeper.service file
$ sudo vi /etc/systemd/system/zookeeper.service

[Unit]
Description=Apache Zookeeper server
Documentation=http://zookeeper.apache.org
Requires=network.target remote-fs.target
After=network.target remote-fs.target

[Service]
Type=simple
ExecStart=/usr/bin/bash /usr/local/kafka/bin/zookeeper-server-start.sh /usr/local/kafka/config/zookeeper.properties
ExecStop=/usr/bin/bash /usr/local/kafka/bin/zookeeper-server-stop.sh
Restart=on-abnormal

[Install]
WantedBy=multi-user.target
2. Kafka.service file
$ sudo vi /etc/systemd/system/kafka.service
[Unit]
Description=Apache Kafka Server
Documentation=http://kafka.apache.org/documentation.html
Requires=zookeeper.service
[Service]
Type=simple
Environment="JAVA_HOME=/usr/lib/jvm/jre-11-openjdk"
ExecStart=/usr/bin/bash /usr/local/kafka/bin/kafka-server-start.sh /usr/local/kafka/config/server.properties
ExecStop=/usr/bin/bash /usr/local/kafka/bin/kafka-server-stop.sh
[Install]
WantedBy=multi-user.target
After the files was created, then we will reload the daemon by using command line below :
$ sudo systemctl daemon-reload
Then, we will start both Zookeeper and Kafka services and enable them to start at system reboot:
$ sudo systemctl start zookeeper
$ sudo system start kafka
$ sudo systemctl enable zookeeper
$ sudo systemctl enable kafka
At the end, we will check the status of service by submitting command line :
$ sudo systemctl status zookeeper
$ sudo systemctl status kafka
Output will be as shown :
[ramansah@infodiginet kafka]$ sudo systemctl status zookeeper
● zookeeper.service - Apache Zookeeper server
   Loaded: loaded (/etc/systemd/system/zookeeper.service; enabled; vendor preset: disabled)
   Active: active (running) since Mon 2023-07-24 10:32:51 WIB; 53s ago
     Docs: http://zookeeper.apache.org
 Main PID: 72324 (java)
    Tasks: 40 (limit: 45724)
   Memory: 121.6M
   CGroup: /system.slice/zookeeper.service
           └─72324 java -Xmx512M -Xms512M -server -XX:+UseG1GC -XX:MaxGCPauseMillis=20 -XX:InitiatingHeapOccupancyPerc>

Jul 24 10:32:53 infodiginet bash[72324]: [2023-07-24 10:32:53,502] INFO zookeeper.snapshot.compression.method = CHECKE>
Jul 24 10:32:53 infodiginet bash[72324]: [2023-07-24 10:32:53,502] INFO Snapshotting: 0x0 to /tmp/zookeeper/version-2/>
Jul 24 10:32:53 infodiginet bash[72324]: [2023-07-24 10:32:53,507] INFO Snapshot loaded in 16 ms, highest zxid is 0x0,>
Jul 24 10:32:53 infodiginet bash[72324]: [2023-07-24 10:32:53,508] INFO Snapshotting: 0x0 to /tmp/zookeeper/version-2/>
Jul 24 10:32:53 infodiginet bash[72324]: [2023-07-24 10:32:53,509] INFO Snapshot taken in 0 ms (org.apache.zookeeper.s>
Jul 24 10:32:53 infodiginet bash[72324]: [2023-07-24 10:32:53,533] INFO PrepRequestProcessor (sid:0) started, reconfig>
Jul 24 10:32:53 infodiginet bash[72324]: [2023-07-24 10:32:53,533] INFO zookeeper.request_throttler.shutdownTimeout = >
Jul 24 10:32:53 infodiginet bash[72324]: [2023-07-24 10:32:53,614] INFO Using checkIntervalMs=60000 maxPerMinute=10000>
Jul 24 10:32:53 infodiginet bash[72324]: [2023-07-24 10:32:53,615] INFO ZooKeeper audit is disabled. (org.apache.zooke>
Jul 24 10:32:58 infodiginet bash[72324]: [2023-07-24 10:32:58,260] INFO Creating new log file: log.1 (org.apache.zooke>
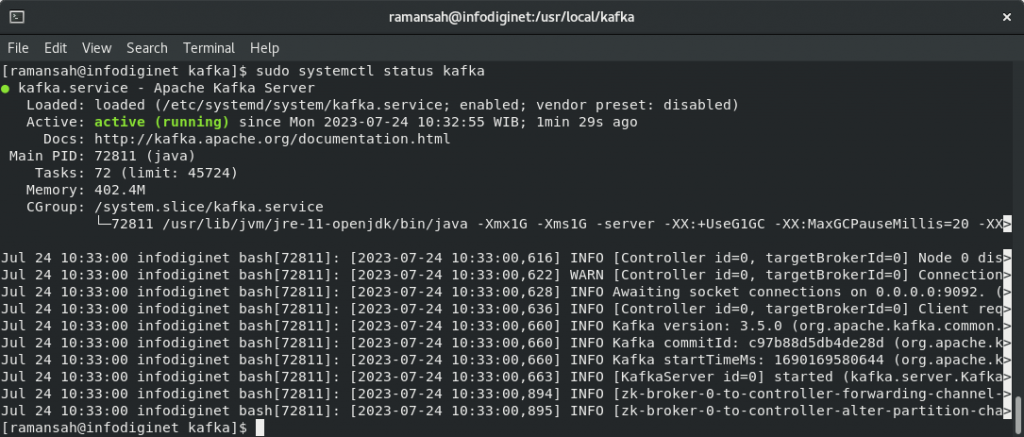
[ramansah@infodiginet kafka]$ sudo systemctl status kafka
● kafka.service - Apache Kafka Server
   Loaded: loaded (/etc/systemd/system/kafka.service; enabled; vendor preset: disabled)
   Active: active (running) since Mon 2023-07-24 10:32:55 WIB; 1min 29s ago
     Docs: http://kafka.apache.org/documentation.html
 Main PID: 72811 (java)
    Tasks: 72 (limit: 45724)
   Memory: 402.4M
   CGroup: /system.slice/kafka.service
           └─72811 /usr/lib/jvm/jre-11-openjdk/bin/java -Xmx1G -Xms1G -server -XX:+UseG1GC -XX:MaxGCPauseMillis=20 -XX>

Jul 24 10:33:00 infodiginet bash[72811]: [2023-07-24 10:33:00,616] INFO [Controller id=0, targetBrokerId=0] Node 0 dis>
Jul 24 10:33:00 infodiginet bash[72811]: [2023-07-24 10:33:00,622] WARN [Controller id=0, targetBrokerId=0] Connection>
Jul 24 10:33:00 infodiginet bash[72811]: [2023-07-24 10:33:00,628] INFO Awaiting socket connections on 0.0.0.0:9092. (>
Jul 24 10:33:00 infodiginet bash[72811]: [2023-07-24 10:33:00,636] INFO [Controller id=0, targetBrokerId=0] Client req>
Jul 24 10:33:00 infodiginet bash[72811]: [2023-07-24 10:33:00,660] INFO Kafka version: 3.5.0 (org.apache.kafka.common.>
Jul 24 10:33:00 infodiginet bash[72811]: [2023-07-24 10:33:00,660] INFO Kafka commitId: c97b88d5db4de28d (org.apache.k>
Jul 24 10:33:00 infodiginet bash[72811]: [2023-07-24 10:33:00,660] INFO Kafka startTimeMs: 1690169580644 (org.apache.k>
Jul 24 10:33:00 infodiginet bash[72811]: [2023-07-24 10:33:00,663] INFO [KafkaServer id=0] started (kafka.server.Kafka>
Jul 24 10:33:00 infodiginet bash[72811]: [2023-07-24 10:33:00,894] INFO [zk-broker-0-to-controller-forwarding-channel->
Jul 24 10:33:00 infodiginet bash[72811]: [2023-07-24 10:33:00,895] INFO [zk-broker-0-to-controller-alter-partition-cha>
Step 4: Testing Apache Kafka
Creating Kafka Topics
At this step, we will take a test for Apache Kafka which was installed on our system, we will need to create at least one topic on the server. We will create a topic named topictest01 with the following command :
Output :
[ramansah@infodiginet kafka]$ pwd
/usr/local/kafka
[ramansah@infodiginet kafka]$ bin/kafka-topics.sh --create --bootstrap-server localhost:9092 --replication-factor 1 --partitions 1 --topic topictest01
Created topic topictest01.
[ramansah@infodiginet kafka]$ bin/kafka-topics.sh --list --bootstrap-server localhost:9092
topictest01
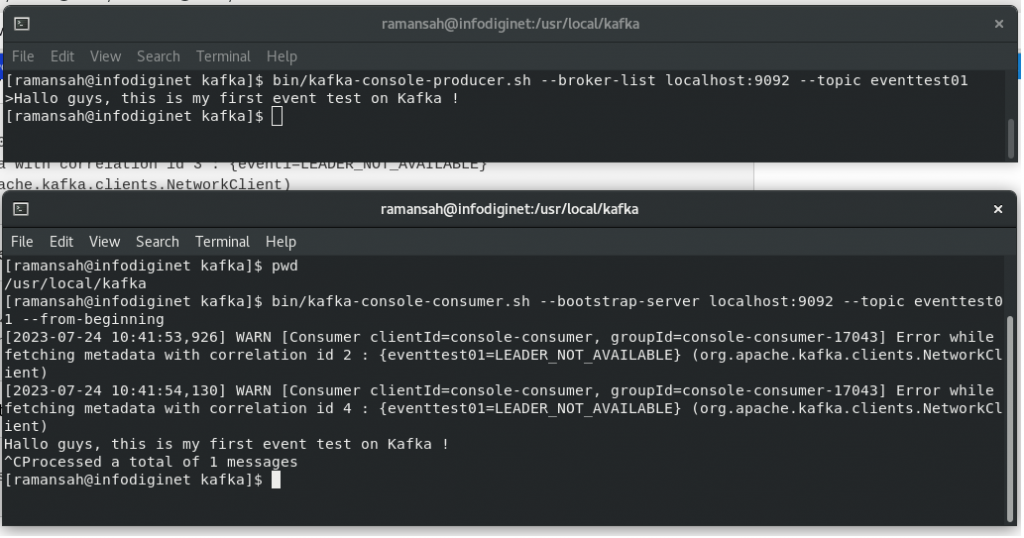
Kafka provides two APIs: Producer and Consumer. The Producer is responsible for creating events and the Consumer displays them on the screen:
$ bin/kafka-console-consumer.sh --bootstrap-server localhost:9092 --topic eventtest01 --from-beginning
[ramansah@infodiginet kafka]$ bin/kafka-console-producer.sh --broker-list localhost:9092 --topic eventtest01

Hello guys, this is my first event test on Kafka !
Open another terminal to receive its message, by submitting command line :
[ramansah@infodiginet kafka]$ pwd
/usr/local/kafka
[ramansah@infodiginet kafka]$ bin/kafka-console-consumer.sh --bootstrap-server localhost:9092 --topic eventtest01 --from-beginning
[2023-07-24 10:41:53,926] WARN [Consumer clientId=console-consumer, groupId=console-consumer-17043] Error while fetching metadata with correlation id 2 : {eventtest01=LEADER_NOT_AVAILABLE} (org.apache.kafka.clients.NetworkClient)
[2023-07-24 10:41:54,130] WARN [Consumer clientId=console-consumer, groupId=console-consumer-17043] Error while fetching metadata with correlation id 4 : {eventtest01=LEADER_NOT_AVAILABLE} (org.apache.kafka.clients.NetworkClient)
Hallo guys, this is my first event test on Kafka !
^CProcessed a total of 1 messages
Conclusion
We have successfully installed Apache Kafka 3.5.0 on Rocky Linux 8 and performed a basic test to ensure it is functioning correctly. Kafka is now ready to be integrated into your applications and data processing pipelines, enabling real-time data streaming and analytics. Remember to configure Kafka further based on your specific requirements, such as changing broker settings or configuring multiple brokers for scalability and fault tolerance.