
In this article we will learn how to install Fail2ban on Ubuntu 22.04 LTS operating system.
Introduction
In the world of server administration, security is of paramount importance. Fail2ban is a powerful and versatile open-source intrusion prevention tool that helps enhance server security by automatically detecting and blocking malicious activities. In this article, we will explore what Fail2ban is, how it works, its key features, and how to set it up on a Linux server.
What is Fail2ban?
Fail2ban is a Python-based intrusion prevention framework designed to protect servers from brute-force attacks, unauthorized access attempts, and other malicious activities. It monitors log files for specified patterns of failed login attempts and dynamically blocks the offending IP addresses using the server’s firewall rules (e.g., iptables).
Key Features of Fail2ban
- Log File Monitoring: Fail2ban scans log files (e.g.,
/var/log/auth.log) to detect patterns of failed login attempts, such as SSH login failures or failed web authentication attempts. - Configurable Filters: Fail2ban uses filters to define patterns to be matched in log files. Administrators can customize these filters based on the services they want to protect.
- Actions and Bans: When Fail2ban detects a specific number of failed login attempts from an IP address within a defined time window, it takes action by banning the IP address temporarily or permanently using the server’s firewall.
- Dynamic Blocking: Fail2ban dynamically updates the firewall rules to block malicious IPs in real-time, providing an effective defense against attackers.
- Flexible Configuration: Fail2ban’s configuration allows administrators to fine-tune various parameters, such as the number of login attempts required for banning, ban duration, and whitelist exceptions.
Fail2ban Installation On Ubuntu 22.04 LTS Operating System
Installing Fail2ban on Ubuntu is a straightforward process. Fail2ban is available in the default repositories, so you can install it using the package manager. Here are the steps to install and set up Fail2ban on Ubuntu 22.04 operating system :
Step 1: Update System Packages
Step 2: Install Fail2ban
Step 3: Start and Enable Fail2ban
Step 4: Basic Configuration (Optional)
Step 5: Restart Fail2ban
Step 6: Monitoring Fail2ban
Step 1: Update System Packages
Before installing any new software, it’s a good practice to update the system packages. Open a terminal and run the following command:
$ sudo apt update
Step 2: Install Fail2ban
Use the package manager (apt) to install Fail2ban:
sudo apt install fail2ban
Output :
ramansah@infodiginet:~$ sudo apt install fail2ban
[sudo] password for ramansah:
Reading package lists... Done
Building dependency tree... Done
Reading state information... Done
The following additional packages will be installed:
  python3-pyinotify whois
Suggested packages:
  mailx monit sqlite3 python-pyinotify-doc
The following NEW packages will be installed:
  fail2ban python3-pyinotify whois
0 upgraded, 3 newly installed, 0 to remove and 264 not upgraded.
Need to get 473 kB of archives.
After this operation, 2.486 kB of additional disk space will be used.
Do you want to continue? [Y/n] Y
Get:1 http://id.archive.ubuntu.com/ubuntu jammy/universe amd64 fail2ban all 0.11.2-6 [394 kB]
Get:2 http://id.archive.ubuntu.com/ubuntu jammy/main amd64 python3-pyinotify all 0.9.6-1.3 [24,8 kB]
Get:3 http://id.archive.ubuntu.com/ubuntu jammy/main amd64 whois amd64 5.5.13 [53,4 kB]
Fetched 473 kB in 14s (34,9 kB/s)
Selecting previously unselected package fail2ban.
(Reading database ... 197862 files and directories currently installed.)
Preparing to unpack .../fail2ban_0.11.2-6_all.deb ...
Unpacking fail2ban (0.11.2-6) ...
Selecting previously unselected package python3-pyinotify.
Preparing to unpack .../python3-pyinotify_0.9.6-1.3_all.deb ...
Unpacking python3-pyinotify (0.9.6-1.3) ...
Selecting previously unselected package whois.
Preparing to unpack .../whois_5.5.13_amd64.deb ...
Unpacking whois (5.5.13) ...
Setting up whois (5.5.13) ...
Setting up fail2ban (0.11.2-6) ...
Setting up python3-pyinotify (0.9.6-1.3) ...
Processing triggers for man-db (2.10.2-1) ...
Step 3: Start and Enable Fail2ban
After installing Fail2ban, start and enable the service to ensure it runs on system boot:
$ sudo systemctl start fail2ban
$ sudo systemctl enable fail2ban
Output :
ramansah@infodiginet:~$ sudo systemctl start fail2ban
ramansah@infodiginet:~$ sudo systemctl enable fail2ban
Synchronizing state of fail2ban.service with SysV service script with /lib/systemd/systemd-sysv-install.
Executing: /lib/systemd/systemd-sysv-install enable fail2ban
Created symlink /etc/systemd/system/multi-user.target.wants/fail2ban.service → /lib/systemd/system/fail2ban.service.
To checking if the fail2ban service is already running by submitting command line :
$ sudo systemctl status fail2ban
Output :
ramansah@infodiginet:~$ sudo systemctl status fail2ban
● fail2ban.service - Fail2Ban Service
     Loaded: loaded (/lib/systemd/system/fail2ban.service; enabled; vendor preset: enabled)
     Active: active (running) since Thu 2023-07-27 14:16:43 WIB; 19s ago
       Docs: man:fail2ban(1)
   Main PID: 7185 (fail2ban-server)
      Tasks: 5 (limit: 4602)
     Memory: 13.1M
        CPU: 174ms
     CGroup: /system.slice/fail2ban.service
             └─7185 /usr/bin/python3 /usr/bin/fail2ban-server -xf start

Jul 27 14:16:43 infodiginet systemd[1]: Started Fail2Ban Service.
Jul 27 14:16:43 infodiginet fail2ban-server[7185]: Server ready
Step 4: Basic Configuration (Optional)
Fail2ban comes with a default configuration file located at /etc/fail2ban/jail.conf. The Fail2ban base directory will be located at /etc/fail2ban/.
ramansah@infodiginet:/etc/fail2ban$ sudo ls -l /etc/fail2ban/
total 92
drwxr-xr-x 2 root root  4096 Jul 27 14:11 action.d
-rw-r--r-- 1 root root  2816 Nov 24  2020 fail2ban.conf
drwxr-xr-x 2 root root  4096 Mar 11  2022 fail2ban.d
drwxr-xr-x 3 root root  4096 Jul 27 14:11 filter.d
-rw-r--r-- 1 root root 25071 Mar 11  2022 jail.conf
drwxr-xr-x 2 root root  4096 Jul 27 14:11 jail.d
-rw-r--r-- 1 root root 25071 Jul 27 14:21 jail.local
-rw-r--r-- 1 root root   645 Nov 24  2020 paths-arch.conf
-rw-r--r-- 1 root root  2827 Nov 24  2020 paths-common.conf
-rw-r--r-- 1 root root   650 Mar 11  2022 paths-debian.conf
-rw-r--r-- 1 root root   738 Nov 24  2020 paths-opensuse.conf
It’s recommended to create a local copy of this file for customizations:
$sudo cp /etc/fail2ban/jail.conf /etc/fail2ban/jail.local
Now, you can edit the jail.local file to customize Fail2ban’s settings to your specific needs. For example, you can adjust the bantime (duration of IP ban), findtime (time window for counting failed login attempts), and maxretry (number of allowed failed attempts). After making any changes to the configuration, restart Fail2ban to apply the new settings by submitting command line :
$ sudo systemctl restart fail2ban
Step 5 : Fail2Ban for SSH (Example)
By default Fail2Ban for SSH should automatically be enabled once you install Fail2Ban, but we can check if it is indeed enabled in the main jail.conf file or by checking the jail status with the CLI tool as shown in the sections below.
ramansah@infodiginet:/etc/fail2ban$ sudo vi /etc/fail2ban/jail.d/sshd.conf

[sshd]
enabled = true
port = ssh
filter = sshd
logpath = /var/log/auth.log
maxretry = 5
bantime = 60
ignoreip = whitelist-IP
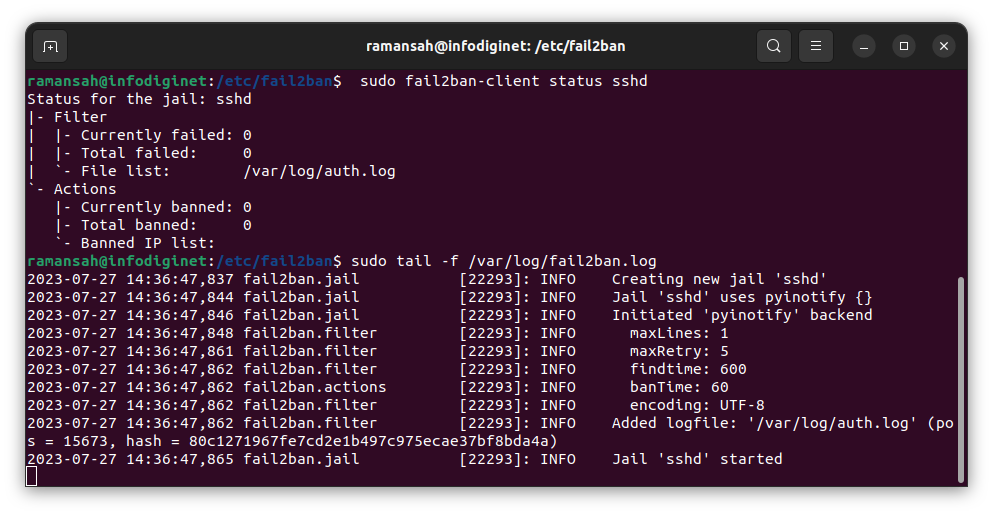
We can check the service by
ramansah@infodiginet:/etc/fail2ban$ sudo fail2ban-client status
Status
|- Number of jail:	1
`- Jail list:	sshd

ramansah@infodiginet:/etc/fail2ban$  sudo fail2ban-client status sshd
Status for the jail: sshd
|- Filter
|  |- Currently failed:	0
|  |- Total failed:	0
|  `- File list:	/var/log/auth.log
`- Actions
   |- Currently banned:	0
   |- Total banned:	0
   `- Banned IP list:
Conclusion
We have successfully installed and set up Fail2ban on our Ubuntu system. Fail2ban will now monitor log files for failed login attempts and automatically block malicious IPs, helping to enhance the security of your server. Remember to regularly review Fail2ban’s logs and adjust the configuration as needed to ensure an effective defense against potential threats.