In this short article we will learn how to install Apache Ant on Ubuntu 22.04 LTS operating system.
Introduction
Apache Ant is a popular build automation tool used primarily for Java projects. It simplifies the process of compiling, testing, and packaging Java applications. As part of the Apache Software Foundation, Ant is an open-source tool that follows the “Write Once, Run Anywhere” philosophy, making it cross-platform compatible. In this article, we will explore what Apache Ant is, how it works, its key features, and how to use it to automate Java build processes.
What is Apache Ant?
Apache Ant, commonly referred to as Ant, is a build tool written in Java. It uses XML-based build files, known as “build.xml,” to define the tasks and dependencies required to compile and assemble Java projects. Ant provides a flexible and scalable way to manage complex build processes efficiently.
Key Features of Apache Ant
- Platform Independence: Since Ant is written in Java, it runs on various platforms, including Windows, macOS, and Linux, without modification.
- Task-Oriented: Ant organizes build tasks as XML elements, which can be easily customized and extended to suit project requirements.
- Extensible: Ant supports custom tasks and can integrate with other tools and libraries, making it highly adaptable to different project setups.
- Dependency Management: Ant can handle project dependencies and ensures that tasks are executed in the correct order to build the project successfully.
- Java-Centric: While Ant is not limited to Java projects, it excels at automating Java build processes, including compiling Java source files, running unit tests, and creating JAR files.
- Parallel Execution: Ant can execute multiple tasks in parallel, improving build performance on multi-core machines.
- Integrated Testing: Ant can integrate with testing frameworks like JUnit to automate testing as part of the build process.
How to Install Apache Ant on Ubuntu 22.04
There are several options to install Apache Ant on Ubuntu Linux system, namely : using APT system package and using source file.
Installting Apache Ant Using APT system Package
Step 1: Update System Packages
Before installing any new software, it’s a good practice to update the system packages. Open a terminal and run the following command:
$ sudo apt update
Step 2: Install Java Development Kit (JDK)
Apache Ant requires Java to be installed on your system. If you don’t have Java Development Kit (JDK) installed, you can install it using the following command:
$ sudo apt install default-jdk
This will install the default version of JDK available in the Ubuntu repositories. Then we will verify it by querying its version.
$ java -version
Output :
ramansah@infodiginet:~$ java -version
openjdk version "11.0.19" 2023-04-18
OpenJDK Runtime Environment (build 11.0.19+7-post-Ubuntu-0ubuntu122.04.1)
OpenJDK 64-Bit Server VM (build 11.0.19+7-post-Ubuntu-0ubuntu122.04.1, mixed mode, sharing)
Step 3: Install Apache Ant
In this tutorial, we will install Apache Ant by using the package manager (apt). The Apache Ant has been already exist on Ubuntu 22.04 repository.
$ sudo apt install ant
The output will be as shown below :
amansah@infodiginet:~$ sudo apt install ant
Reading package lists… Done
Building dependency tree… Done
Reading state information… Done
The following additional packages will be installed:
ant-optional
Suggested packages:
ant-doc antlr javacc junit junit4 jython libactivation-java libbcel-java libbsf-java
libcommons-logging-java libcommons-net-java libmail-java libjaxp1.3-java libjdepend-java
libjsch-java liblog4j1.2-java liboro-java libregexp-java libxalan2-java
libxml-commons-resolver1.1-java libxz-java
The following NEW packages will be installed:
ant ant-optional
0 upgraded, 2 newly installed, 0 to remove and 136 not upgraded.
Need to get 2.467 kB of archives.
After this operation, 3.432 kB of additional disk space will be used.
Do you want to continue? [Y/n] Y
Get:1 http://id.archive.ubuntu.com/ubuntu jammy/universe amd64 ant all 1.10.12-1 [2.100 kB]
Get:2 http://id.archive.ubuntu.com/ubuntu jammy/universe amd64 ant-optional all 1.10.12-1 [368 kB]
Fetched 2.467 kB in 2min 5s (19,8 kB/s)
Selecting previously unselected package ant.
(Reading database … 199591 files and directories currently installed.)
Preparing to unpack …/archives/ant_1.10.12-1_all.deb …
Unpacking ant (1.10.12-1) …
Selecting previously unselected package ant-optional.
Preparing to unpack …/ant-optional_1.10.12-1_all.deb …
Unpacking ant-optional (1.10.12-1) …
Setting up ant (1.10.12-1) …
Setting up ant-optional (1.10.12-1) …
Processing triggers for man-db (2.10.2-1) …
Step 4: Verify Apache Ant Installation
After the installation is complete, you can verify that Apache Ant is installed by running the following command:
$ ant -version
This command will display the installed version of Apache Ant on your system as shown below :
ramansah@infodiginet:~$ ant -version
Apache Ant(TM) version 1.10.12 compiled on January 17 1970
Step 5: Optional – Set ANT_HOME Environment Variable (Recommended)
To use Apache Ant globally on your system, it’s recommended to set the ANT_HOME environment variable. Open the .bashrc or .bash_profile file and add the following line at the end:
$ export ANT_HOME=/usr/share/ant
Save the file and run source ~/.bashrc or source ~/.bash_profile to apply the changes.
Step 6: Optional – Add Ant to PATH (Recommended)
For easier access to Apache Ant from the terminal, you can add the Ant bin directory to your system’s PATH variable. Open the .bashrc or .bash_profile file and add the following line at the end:
export PATH=$PATH:$ANT_HOME/bin
Save the file and run source ~/.bashrc or source ~/.bash_profile to apply the changes.
Installing Apache Ant Using Source File
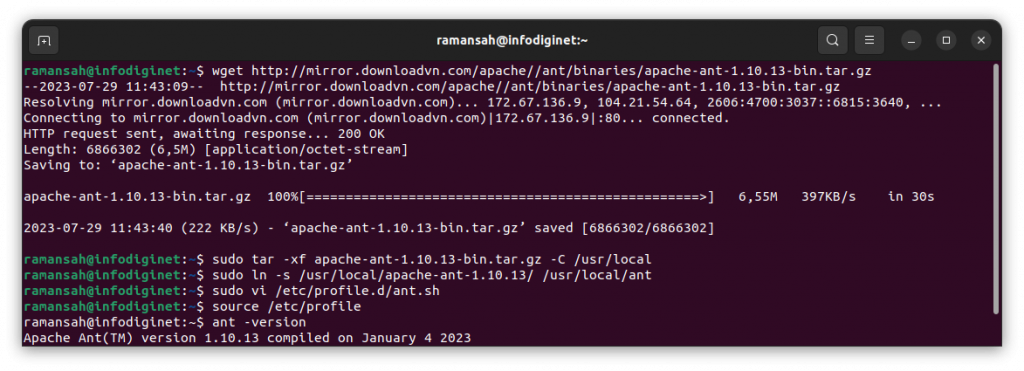
By using source file option, we will install Apache Ant use Apache Ant source file, download, extract, make Ant source file. By using wget command, we will download and by using tar command we will extract the file and make it to be in executed file.
$ wget http://mirror.downloadvn.com/apache//ant/binaries/apache-ant-1.10.13-bin.tar.gz
$ sudo tar -xf apache-ant-1.10.13-bin.tar.gz -C /usr/local
$ sudo ln -s /usr/local/apache-ant-1.10.13/ /usr/local/ant
$ sudo vi /etc/profile.d/ant.sh
$ source /etc/profile
$ ant -version
Output :
ramansah@infodiginet:~$ wget http://mirror.downloadvn.com/apache//ant/binaries/apache-ant-1.10.13-bin.tar.gz--2023-07-29 11:43:09--  http://mirror.downloadvn.com/apache//ant/binaries/apache-ant-1.10.13-bin.tar.gzResolving mirror.downloadvn.com (mirror.downloadvn.com)... 172.67.136.9, 104.21.54.64, 2606:4700:3037::6815:3640, ...Connecting to mirror.downloadvn.com (mirror.downloadvn.com)|172.67.136.9|:80... connected.HTTP request sent, awaiting response... 200 OKLength: 6866302 (6,5M) [application/octet-stream]Saving to: ‘apache-ant-1.10.13-bin.tar.gz’apache-ant-1.10.13-bin.tar.gz  100%[==================================================>]   6,55M   397KB/s    in 30s     2023-07-29 11:43:40 (222 KB/s) - ‘apache-ant-1.10.13-bin.tar.gz’ saved [6866302/6866302]

ramansah@infodiginet:~$ sudo tar -xf apache-ant-1.10.13-bin.tar.gz -C /usr/local
ramansah@infodiginet:~$ sudo ln -s /usr/local/apache-ant-1.10.13/ /usr/local/ant
ramansah@infodiginet:~$ sudo vi /etc/profile.d/ant.sh
ramansah@infodiginet:~$ source /etc/profile
ramansah@infodiginet:~$ ant -version
Apache Ant(TM) version 1.10.13 compiled on January 4 2023
Conclusion
Apache Ant is a powerful build automation tool that simplifies the process of compiling and packaging Java projects. With its platform independence, task-oriented approach, and extensibility, Ant is a valuable tool for Java developers looking to streamline their build processes. By defining build tasks in XML, developers can easily automate repetitive tasks and create a smooth and efficient build workflow for their Java projects.