In this tutorial we will learn how to install Apache Hadoop on Ubuntu 22.04 LTS Linux operating system.
Introduction
In the era of big data, managing and processing massive volumes of information has become a significant challenge for organizations. Apache Hadoop, an open-source framework, has revolutionized the world of data processing and analytics by providing a scalable and distributed platform. In this article, we’ll dive into the world of Apache Hadoop, exploring its architecture, key components, and the benefits it brings to the table.
What is Apache Hadoop?
Apache Hadoop is a framework designed for processing, storing, and analyzing vast amounts of data in a distributed and fault-tolerant manner. It enables organizations to work with structured and unstructured data across clusters of commodity hardware, making it an essential tool for modern data-driven businesses.
Key Components of Apache Hadoop
- Hadoop Distributed File System (HDFS) :HDFS is the primary storage system of Hadoop, designed to store large files across multiple machines. It breaks data into blocks and replicates them across the cluster for fault tolerance. HDFS forms the foundation for storing data efficiently in a distributed environment.
- MapReduce: MapReduce is a programming model and processing engine that enables parallel processing of large datasets. It divides tasks into smaller sub-tasks, processes them in parallel, and then aggregates the results. MapReduce is the heart of data processing in Hadoop.
- YARN (Yet Another Resource Negotiator): YARN is the resource management and job scheduling component of Hadoop. It manages resources and allocates them to applications, allowing multiple applications to run simultaneously on the same cluster.
- Hadoop Common: Hadoop Common includes the libraries, utilities, and APIs that support the various Hadoop modules. It provides the foundational components necessary for the entire Hadoop ecosystem to function cohesively.
How To Install Apache Hadoop On Ubuntu 22.04 LTS
In this tutorial we will use the latest stable Apache Hadoop for the installation test. We will use Apache Hadoop version 3.3.5. Installing Apache Hadoop on Ubuntu involves several steps to set up the necessary components and configuration. Here’s a basic guide to help us get started:
- Prerequisite
- Step 1: Install Java Development Kit
- Step 2: Create User for Hadoop
- Step 3: Install Hadoop on Ubuntu
- Step 4: Configuring Hadoop
- Step 5: Starting Hadoop Cluster
Note: This guide covers the installation of Hadoop 3.x. Make sure to check the official Apache Hadoop documentation for any updates or changes.
Prerequisite
Before installing Apache Hadoop,we have to ensure if our environment has me the minimal requirements. For this purpose we will need :
- An updated Ubuntu 22.04 LTS system
- user with root or suod privilege
Step 1 :Install Java Development Kit
To install Apache Hadoop on the Ubuntu system, we must have Java installed on our system. Hadoop requires Java 8 or later. The OpenJDK installation has been discussed on How to Install OpenJDK 11 on CentoS 8 article. At this stage we will verify it by submitting command line :
$ java --version
Output :
ramansah@infodiginet:~$ java --version
openjdk 11.0.20 2023-07-18
OpenJDK Runtime Environment (build 11.0.20+8-post-Ubuntu-1ubuntu122.04)
OpenJDK 64-Bit Server VM (build 11.0.20+8-post-Ubuntu-1ubuntu122.04, mixed mode, sharing)
Step 2: Create User for Hadoop
Apache Hadoop requires a dedicated account to manage Apache Hadoop. All the Hadoop components will run as the user that you create for Apache Hadoop, and the user will also be used for logging in to Hadoop’s web interface. Here are the step to create a new user account on Ubuntu 22.04 system, we will name it as ‘hadoop’.
$ sudo adduser hadoop
Output :
ramansah@infodiginet:~$ sudo adduser hadoop
[sudo] password for ramansah:
Adding user `hadoop' ...
Adding new group `hadoop' (1001) ...
Adding new user `hadoop' (1001) with group `hadoop' ...
Creating home directory `/home/hadoop' ...
Copying files from `/etc/skel' ...
New password:
Retype new password:
passwd: password updated successfully
Changing the user information for hadoop
Enter the new value, or press ENTER for the default
Full Name []:
Room Number []:
Work Phone []:
Home Phone []:
Other []:
Is the information correct? [Y/n] Y
For this new user account, we need it to configure password-less SSH access to the system, so we will generate an SSH keypair and copy the generated public key to the authorized key file and set the proper permissions. Here are the steps :
$ su - hadoop
$ ssh-keygen -t rsa
$ cat ~/.ssh/id_rsa.pub >> ~/.ssh/authorized_keys
Output :
hadoop@infodiginet:~$ ssh-keygen -t rsa
Generating public/private rsa key pair.
Enter file in which to save the key (/home/hadoop/.ssh/id_rsa):
Created directory '/home/hadoop/.ssh'.
Enter passphrase (empty for no passphrase):
Enter same passphrase again:
Your identification has been saved in /home/hadoop/.ssh/id_rsa
Your public key has been saved in /home/hadoop/.ssh/id_rsa.pub
The key fingerprint is:
SHA256:V65dQ3mHpBVptGiCjQ/dJiF4WOvuWFrzIaW2xWveYnE hadoop@infodiginet
The key's randomart image is:
+---[RSA 3072]----+
| +o . .=o |
| o .B o =o+ |
| .= = B.= o|
| . o B . ..|
| S + . o |
| . =.oE. . |
| O =o. |
| B *++ |
| o o++.. |
+----[SHA256]-----+
hadoop@infodiginet:~$ cat ~/.ssh/id_rsa.pub >> ~/.ssh/authorized_keys
hadoop@infodiginet:~$ more ~/.ssh/authorized_keys
ssh-rsa AAAAB3NzaC1yc2EAAAADAQABAAABgQCh9Cp5mxGrIgs8/64gyOWe3RQxSvY0eR+Wf/MhZYmMuIhC27/GdW3n+qhd
l9uc7YOZ9ZwJxacat8EAkJb9zbZdM3umLmlS+18w3IzxXdMfyncEbEjK/GP8HGpFItPeGFkkX9jZ/97kspwXxwMfgiwbDp/N
TcBbklZunCnczgFMCu2BSHKXmIrI+9hve8io2BgRwfwdCg0X/JRThQiIum9npKay0cPIBRKM+txGhjOqXJJ/Emk0tYqIKsWk
eEfAB+j9iNHyXY06A5rUVLb0qod9tuQQh+66ROljdJUFzLmWVWamfuWH8xp6XLzB6siG4O9btFoIsXfe+V+ncCzSokpEjSzk
YIe9im5DeZ5doTamktXsgW9hqtCg0sV8pcnZbdMmqTwXzzbu8PLp92f2+ozHkPW4cJWTbr01T0IjgXaLWb12lT2sOVEGOnLD
LApNPYB50VuUHvHfplpkZKZABvCu2hGDgaU+LbMJujmTDRCp8i/er7Rw/EGQI35WvfpA/Nk= hadoop@infodiginet
hadoop@infodiginet:~$ chmod 640 ~/.ssh/authorized_keys
Then we test it by using command line :
$ ssh localhost
Output :
hadoop@infodiginet:~$ ssh localhost
ssh: connect to host localhost port 22: Connection refused
hadoop@infodiginet:~$ ssh localhost
The authenticity of host 'localhost (127.0.0.1)' can't be established.
ED25519 key fingerprint is SHA256:Yp2Pvi2cX2LueL+Jrr1OoAYe7XO6m7FA6r019PDDAzk.
This key is not known by any other names
Are you sure you want to continue connecting (yes/no/[fingerprint])? yes
Warning: Permanently added 'localhost' (ED25519) to the list of known hosts.
Welcome to Ubuntu 22.04.2 LTS (GNU/Linux 6.2.0-26-generic x86_64)

* Documentation: https://help.ubuntu.com
* Management: https://landscape.canonical.com
* Support: https://ubuntu.com/advantage

* Introducing Expanded Security Maintenance for Applications.
Receive updates to over 25,000 software packages with your
Ubuntu Pro subscription. Free for personal use.

https://ubuntu.com/pro

Expanded Security Maintenance for Applications is not enabled.

0 updates can be applied immediately.

Enable ESM Apps to receive additional future security updates.
See https://ubuntu.com/esm or run: sudo pro status


The list of available updates is more than a week old.
To check for new updates run: sudo apt update

The programs included with the Ubuntu system are free software;
the exact distribution terms for each program are described in the
individual files in /usr/share/doc/*/copyright.

Ubuntu comes with ABSOLUTELY NO WARRANTY, to the extent permitted by
applicable law.
Step 3: Install Hadoop on Ubuntu
In this stage, we will install Hadoop on the system. For this purpose we will download the Hadoop source tarball file from Apache Hadoop official web page. From this step, we will use account as hadoop. Here is the step :
1. Download the latest apache Hadoop
$ wget https://archive.apache.org/dist/hadoop/common/hadoop-3.3.5/hadoop-3.3.5.tar.gz
Output :
hadoop@infodiginet:~$ wget https://archive.apache.org/dist/hadoop/common/hadoop-3.3.5/hadoop-3.3.5.tar.gz
--2023-08-14 14:54:58-- https://archive.apache.org/dist/hadoop/common/hadoop-3.3.5/hadoop-3.3.5.tar.gz
Resolving archive.apache.org (archive.apache.org)... 65.108.204.189, 2a01:4f9:1a:a084::2
Connecting to archive.apache.org (archive.apache.org)|65.108.204.189|:443... connected.
HTTP request sent, awaiting response... 200 OK
Length: 706533213 (674M) [application/x-gzip]
Saving to: ‘hadoop-3.3.5.tar.gz’

hadoop-3.3.5.tar.gz 100%[======================================>] 673,80M 972KB/s in 22m 44s

2023-08-14 15:17:43 (506 KB/s) - ‘hadoop-3.3.5.tar.gz’ saved [706533213/706533213]
2. Extract the file
We will extract the file by using command line :
hadoop@infodiginet:~$ $ tar xzf hadoop-3.3.5.tar.gz
hadoop@infodiginet:~$ ls -ltr
total 689988
drwxr-xr-x 10 hadoop hadoop 4096 Mar 15 23:58 hadoop-3.3.5
-rw-rw-r-- 1 hadoop hadoop 706533213 Mar 16 02:35 hadoop-3.3.5.tar.gz
drwx------ 3 hadoop hadoop 4096 Agu 14 14:51 snap
3. Moving folder
To hide version information, we will move Apache hadoop directory to a new ones.
hadoop@infodiginet:~$ mv hadoop-3.3.5 hadoop
4. Configuring Apache Hadoop and Java Environment Variables
By default, the user environment variable will be located at ~/.bashrc file. For this purpose we will append some configuration environment for Hadoop and Java. We will add the following entries to the file.
hadoop@infodiginet:~$ vi ~/.bashrc
export JAVA_HOME=/usr/lib/jvm/java-11-openjdk-amd64
export HADOOP_HOME=/home/hadoop/hadoop
export HADOOP_INSTALL=$HADOOP_HOME
export HADOOP_MAPRED_HOME=$HADOOP_HOME
export HADOOP_COMMON_HOME=$HADOOP_HOME
export HADOOP_HDFS_HOME=$HADOOP_HOME
export HADOOP_YARN_HOME=$HADOOP_HOME
export HADOOP_COMMON_LIB_NATIVE_DIR=$HADOOP_HOME/lib/native
export PATH=$PATH:$HADOOP_HOME/sbin:$HADOOP_HOME/bin
export HADOOP_OPTS="-Djava.library.path=$HADOOP_HOME/lib/native"
5. Load The configuration
Then we will load the configuration by using this command:

hadoop@infodiginet:~$ source ~/.bashrc
6. Setting JAVA_HOME in hadoop-env.sh
At this step, we will set the JAVA_HOME for hadoop environment. We have to ensure if this entry is correct. At my environment, we are using openJDK 11, then we will insert this entry at the file.
hadoop@infodiginet:~$ vi $HADOOP_HOME/etc/hadoop/hadoop-env.sh
export JAVA_HOME=/usr/lib/jvm/java-11-openjdk-amd64
Step 4: Configuring Apache Hadoop
1. Creating namenode and datanode insed hadoop user home directory.
For this purpose we will run the following command to create both directories:
$ mkdir -p ~/hadoopdata/hdfs/{namenode,datanode}
2. Edit the following files under /etc/ directory :
$HADOOP_HOME/etc/hadoop/core-site.xml, $HADOOP_HOME/etc/hadoop/hdfs-site.xml , $HADOOP_HOME/etc/hadoop/mapred-site.xml and HADOOP_HOME/etc/hadoop/yarn-site.xml-site.xml.
hadoop@infodiginet:~$ vi $HADOOP_HOME/etc/hadoop/core-site.xml
...
<configuration>
<property>
<name>fs.defaultFS</name>
<value>hdfs://localhost:9000</value>
</property>
</configuration>


hadoop@infodiginet:~$ vi $HADOOP_HOME/etc/hadoop/hdfs-site.xml
...
<!-- Put site-specific property overrides in this file. -->
<configuration>
<property>
<name>dfs.replication</name>
<value>1</value>
</property>

<property>
<name>dfs.name.dir</name>
<value>file:///home/hadoop/hadoopdata/hdfs/namenode</value>
</property>

<property>
<name>dfs.data.dir</name>
<value>file:///home/hadoop/hadoopdata/hdfs/datanode</value>
</property>

</configuration>
hadoop@infodiginet:~$ vi $HADOOP_HOME/etc/hadoop/mapred-site.xml
...
<!-- Put site-specific property overrides in this file. -->

<configuration>
<property>
<name>mapreduce.framework.name</name>
<value>yarn</value>
</property>
</configuration>
hadoop@infodiginet:~$ vi $HADOOP_HOME/etc/hadoop/yarn-site.xml-site.xml
...
<configuration>
<property>
<name>yarn.nodemanager.aux-services</name>
<value>mapreduce_shuffle</value>
</property>
</configuration>
Step 5: Starting Apache Hadoop Cluster
This is the last step in installing and configuring Apache Hadoop on Linux system. We will start Apache Hadoop cluster to run smoothly on the system. For this purpose we will need to format the Namenode as a hadoop user. To format the Hadoop Namenode, we will submit the following command line :
$ hdfs namenode -format
Output :
hadoop@infodiginet:~$ hdfs namenode -format
WARNING: /home/hadoop/hadoop/logs does not exist. Creating.
2023-08-14 20:55:37,993 INFO namenode.NameNode: STARTUP_MSG:
/************************************************************
STARTUP_MSG: Starting NameNode
STARTUP_MSG: host = infodiginet/127.0.1.1
STARTUP_MSG: args = [-format]
STARTUP_MSG: version = 3.3.5
STARTUP_MSG: classpath = /home/hadoop/hadoop/etc/hadoop:/home/hadoop/hadoop/share/hadoop/common/lib/jackson-core-asl-1.9.13.jar:/home/hadoop/hadoop/share/hadoop/common/lib/zookeeper-3.5.6.jar:/home/hadoop/hadoop/share/hadoop/common/lib/paranamer-2.3.jar:/home/hadoop/hadoop/share/hadoop/common/lib/token-provider-1.0.1.jar:/home/hadoop/hadoop/share/hadoop/common/lib/jersey-core-1.19.4.jar:/home/hadoop/hadoop/share/hadoop/common/lib/netty-transport-native-epoll-4.1.77.Final-linux-aarch_64.jar:/home/hadoop/hadoop/share/hadoop/common/lib/commons-compress-1.21.jar:/home/hadoop/hadoop/share/hadoop/common/lib/jettison-1.5.3.jar:/home/hadoop/hadoop/share/hadoop/common/lib/netty-common-4.1.77.Final.jar:/home/hadoop/hadoop/share/hadoop/common/lib/audience-annotations-0.5.0.jar:/home/hadoop/hadoop/share/hadoop/common/lib/stax2-api-4.2.1.jar:/home/hadoop/hadoop/share/hadoop/common/lib/kerby-asn1-1.0.1.jar:/home/hadoop/hadoop/share/hadoop/common/lib/hadoop-

...

2023-08-14 20:55:39,971 INFO namenode.FSImageFormatProtobuf: Saving image file /home/hadoop/hadoopdata/hdfs/namenode/current/fsimage.ckpt_0000000000000000000 using no compression
2023-08-14 20:55:40,130 INFO namenode.FSImageFormatProtobuf: Image file
/home/hadoop/hadoopdata/hdfs/namenode/current/fsimage.ckpt_0000000000000000000 of size 401 bytes saved in 0 seconds .
2023-08-14 20:55:40,147 INFO namenode.NNStorageRetentionManager: Going to retain 1 images with txid >= 0
2023-08-14 20:55:40,182 INFO namenode.FSNamesystem: Stopping services started for active state
2023-08-14 20:55:40,183 INFO namenode.FSNamesystem: Stopping services started for standby state
2023-08-14 20:55:40,200 INFO namenode.FSImage: FSImageSaver clean checkpoint: txid=0 when meet shutdown.
2023-08-14 20:55:40,201 INFO namenode.NameNode: SHUTDOWN_MSG:
/************************************************************
SHUTDOWN_MSG: Shutting down NameNode at infodiginet/127.0.1.1
************************************************************/
From the log above we notice if the hadoop is quite stable to be started up.
To startup the Hadoop cluster, we will submit the following command line :
$ start-all.sh
Output :
hadoop@infodiginet:~$ start-all.sh
WARNING: Attempting to start all Apache Hadoop daemons as hadoop in 10 seconds.
WARNING: This is not a recommended production deployment configuration.
WARNING: Use CTRL-C to abort.
Starting namenodes on [localhost]
Starting datanodes
Starting secondary namenodes [infodiginet]
infodiginet: Warning: Permanently added 'infodiginet' (ED25519) to the list of known hosts.
Starting resourcemanager
Starting nodemanagers

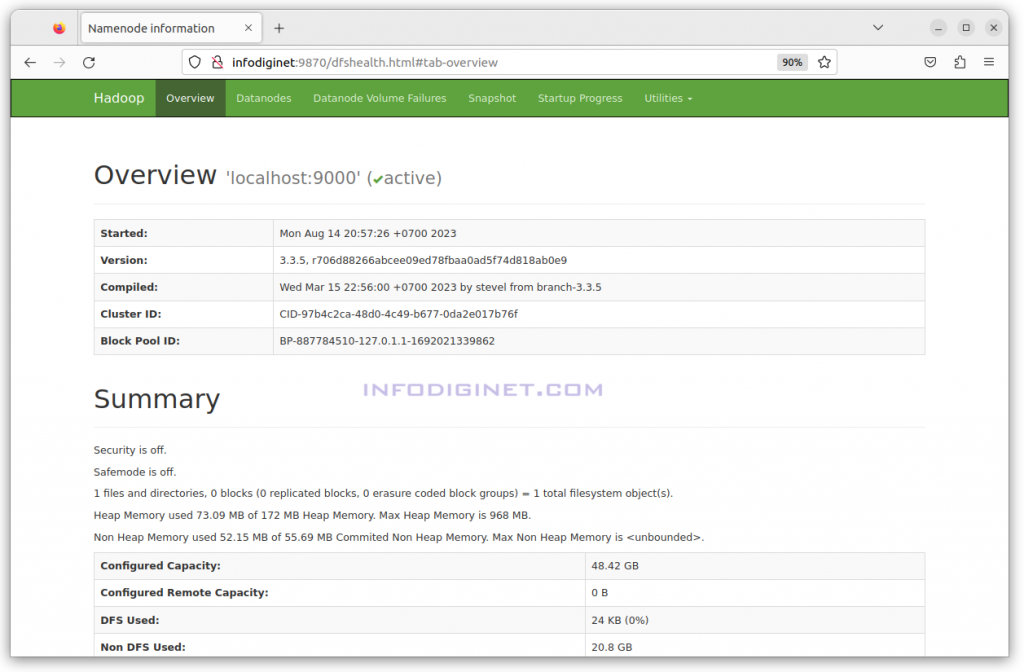
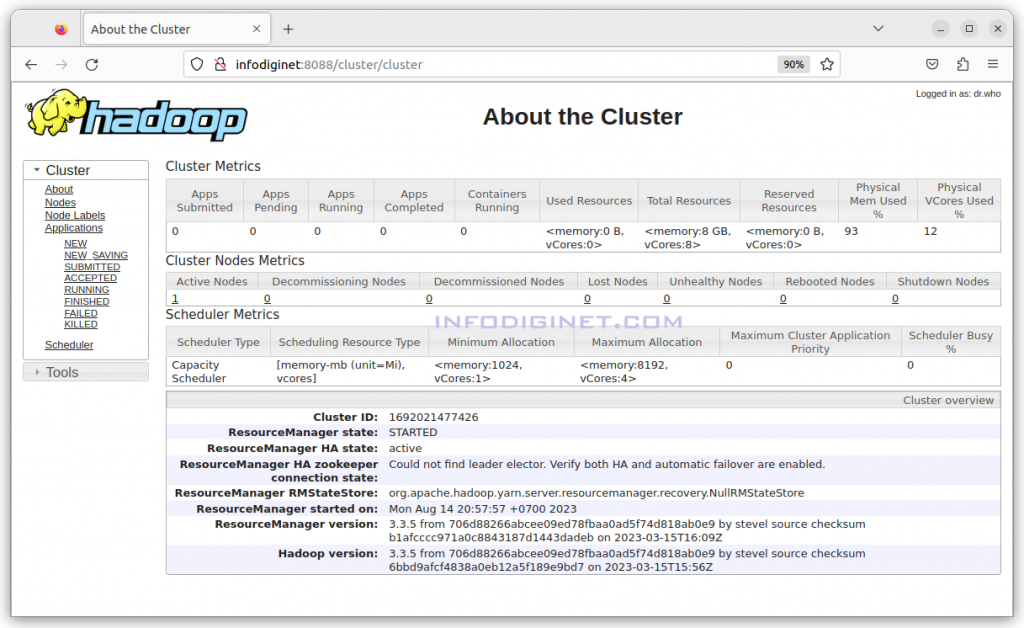
After Hadoop services are started, then we can access Hadoop and Hadoop application page.
1. Hadoop can be accessed at http://<ip_address_or_hostname>:9870
2. Hadoop application page can be accessed at http://<ip_address_or_hostname>:8088
Conclusion
We have successfully installed Apache Hadoop version 3.3.5 on Ubuntu 22.04 LTS operating system. This guide covers the basic installation steps, but setting up a Hadoop cluster for production requires additional configuration and considerations. Hadoop offers powerful capabilities for processing and analyzing big data, making it a valuable tool for data-intensive applications and organizations.