The most widely used web server in the world is the Apache HTTP server. The Apache web server provides many powerful features to suit our needs, including dynamically loadable modules, strong media support, and extensive integration with other popular software. The ease of installation and configuration also helps accelerate the growth of Apache web server usage. In this short tutorial we will learn how to install Apache Web Server on Ubuntu 22.04 LTS operating system.
Apache Web Server Installation Guide
Prerequisites
Before we begin the Apache Web Server installation tutorial, we will need to prepare any requirements as mention below :
- an Ubuntu 22.04 server system
- a non-root user with sudo privileges
- a firewall enabled to block non-essential ports
- sufficient disk and good internet access
The Apache Web Server Installation steps:
The explanation of the installation process will be discussed in several sub-chapters below.
1. Update System
The first step of installation is to update our local packages software, this task is to refresh and make sure if we are accessing the latest packages versions. This task will cut down the installation time and it also helps prevent zero-day exploits against outdated software. To update our packages software we will use command line :
$ sudo apt update
The output on our environment is as shown below :
ramans@infodiginet:~$ sudo apt update
Hit:1 http://id.archive.ubuntu.com/ubuntu jammy InRelease
Get:2 http://security.ubuntu.com/ubuntu jammy-security InRelease [110 kB]
Get:3 http://id.archive.ubuntu.com/ubuntu jammy-updates InRelease [114 kB]
Get:4 http://id.archive.ubuntu.com/ubuntu jammy-backports InRelease [99,8 kB]
Get:5 http://id.archive.ubuntu.com/ubuntu jammy-updates/main amd64 DEP-11 Metadata [94,9 kB]
Get:6 http://id.archive.ubuntu.com/ubuntu jammy-updates/universe amd64 Packages [757 kB]
Get:7 http://security.ubuntu.com/ubuntu jammy-security/main i386 Packages [214 kB]
Get:8 http://id.archive.ubuntu.com/ubuntu jammy-updates/universe i386 Packages [554 kB]
Get:9 http://id.archive.ubuntu.com/ubuntu jammy-updates/universe Translation-en [126 kB]
Get:10 http://id.archive.ubuntu.com/ubuntu jammy-updates/universe amd64 DEP-11 Metadata [257 kB]
Get:11 http://id.archive.ubuntu.com/ubuntu jammy-updates/multiverse amd64 DEP-11 Metadata [940 B]
Get:12 http://id.archive.ubuntu.com/ubuntu jammy-backports/universe amd64 DEP-11 Metadata [11,6 kB]
Get:13 http://security.ubuntu.com/ubuntu jammy-security/main amd64 Packages [497 kB]
Get:14 http://security.ubuntu.com/ubuntu jammy-security/main Translation-en [108 kB]
Get:15 http://security.ubuntu.com/ubuntu jammy-security/main amd64 DEP-11 Metadata [20,1 kB]
Get:16 http://security.ubuntu.com/ubuntu jammy-security/restricted amd64 Packages [409 kB]
Get:17 http://security.ubuntu.com/ubuntu jammy-security/restricted Translation-en [62,3 kB]
Get:18 http://security.ubuntu.com/ubuntu jammy-security/universe amd64 DEP-11 Metadata [13,3 kB]
Fetched 3.449 kB in 17s (199 kB/s)
Reading package lists... Done
Building dependency tree... Done
Reading state information... Done
All packages are up to date.
2. Install Apache Web Server
Then we will install Apache Web Server package on our Ubuntu 22.04 system, by submitting command line :
$ sudo apt install apache2
The output on our environment is as shown below :
ramans@infodiginet:~$ sudo apt install apache2
Reading package lists... Done
Building dependency tree... Done
Reading state information... Done
The following packages were automatically installed and are no longer required:
  libflashrom1 libftdi1-2
Use 'sudo apt autoremove' to remove them.
The following additional packages will be installed:
  apache2-bin apache2-data apache2-utils libapr1 libaprutil1 libaprutil1-dbd-sqlite3
  libaprutil1-ldap
Suggested packages:
  apache2-doc apache2-suexec-pristine | apache2-suexec-custom www-browser
The following NEW packages will be installed:
  apache2 apache2-bin apache2-data apache2-utils libapr1 libaprutil1 libaprutil1-dbd-sqlite3
  libaprutil1-ldap
0 upgraded, 8 newly installed, 0 to remove and 0 not upgraded.
Need to get 1.916 kB of archives.
After this operation, 7.706 kB of additional disk space will be used.
Do you want to continue? [Y/n] Y
Get:1 http://id.archive.ubuntu.com/ubuntu jammy/main amd64 libapr1 amd64 1.7.0-8build1 [107 kB]
Get:2 http://id.archive.ubuntu.com/ubuntu jammy/main amd64 libaprutil1 amd64 1.6.1-5ubuntu4 [92,4 kB]
Get:3 http://id.archive.ubuntu.com/ubuntu jammy/main amd64 libaprutil1-dbd-sqlite3 amd64 1.6.1-5ubuntu4 [11,3 kB]
Get:4 http://id.archive.ubuntu.com/ubuntu jammy/main amd64 libaprutil1-ldap amd64 1.6.1-5ubuntu4 [9.162 B]
Get:5 http://id.archive.ubuntu.com/ubuntu jammy-updates/main amd64 apache2-bin amd64 2.4.52-1ubuntu4.2 [1.344 kB]
Get:6 http://id.archive.ubuntu.com/ubuntu jammy-updates/main amd64 apache2-data all 2.4.52-1ubuntu4.2 [165 kB]
Get:7 http://id.archive.ubuntu.com/ubuntu jammy-updates/main amd64 apache2-utils amd64 2.4.52-1ubuntu4.2 [89,3 kB]
Get:8 http://id.archive.ubuntu.com/ubuntu jammy-updates/main amd64 apache2 amd64 2.4.52-1ubuntu4.2 [97,9 kB]

. . .

Enabling site 000-default.
Created symlink /etc/systemd/system/multi-user.target.wants/apache2.service → /lib/systemd/system/apache2.service.
Created symlink /etc/systemd/system/multi-user.target.wants/apache-htcacheclean.service → /lib/systemd/system/apach
e-htcacheclean.service.
Processing triggers for ufw (0.36.1-4build1) ...
Processing triggers for man-db (2.10.2-1) ...
Processing triggers for libc-bin (2.35-0ubuntu3.1) ...
3. Verify Apache Web Server Installation
After the installation was completed done, then we will verify it by checking its service or via web browser to check if it service is already running properly.
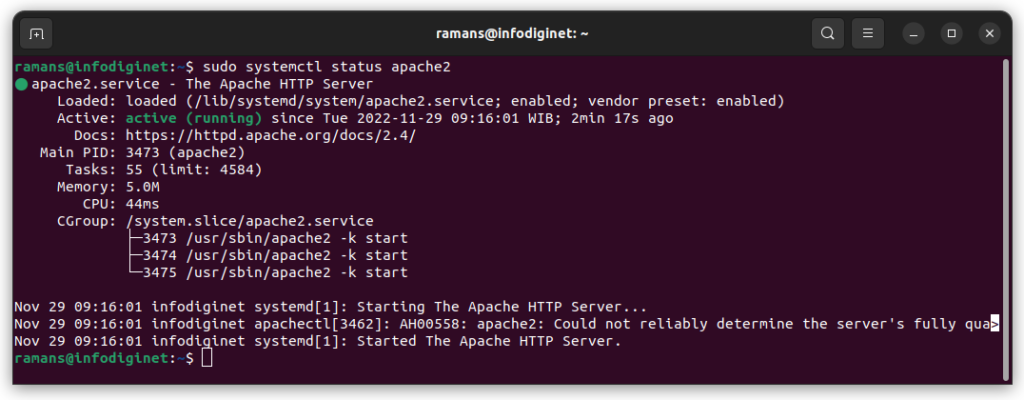
3.1. Checking Apache Web Server service task will be using command line :
$ sudo systemctl status apache2.
Output :
ramans@infodiginet:~$ sudo systemctl status apache2
● apache2.service - The Apache HTTP Server
     Loaded: loaded (/lib/systemd/system/apache2.service; enabled; vendor preset: enabled)
     Active: active (running) since Tue 2022-11-29 09:16:01 WIB; 2min 17s ago
       Docs: https://httpd.apache.org/docs/2.4/
   Main PID: 3473 (apache2)
      Tasks: 55 (limit: 4584)
     Memory: 5.0M
        CPU: 44ms
     CGroup: /system.slice/apache2.service
             ├─3473 /usr/sbin/apache2 -k start
             ├─3474 /usr/sbin/apache2 -k start
             └─3475 /usr/sbin/apache2 -k start

Nov 29 09:16:01 infodiginet systemd[1]: Starting The Apache HTTP Server...
Nov 29 09:16:01 infodiginet apachectl[3462]: AH00558: apache2: Could not reliably determine the server's fully qua>
Nov 29 09:16:01 infodiginet systemd[1]: Started The Apache HTTP Server.
3.2. Checking Apache Web Server via web browser
We will use web browser to check if Apache Web Server is already running and servicing, by hit the url : http://ip_address_or_hostane_or_localhost, the result is as shown below :

4. Setting Firewall
After installation was completed done, we are recommended to adjust Firewall setting to be suited with our requirements. In this sub-chapter will be explained access management for the Apache web server through the firewall. The use of a firewall allows any application that is outside the system to be allowed to access the system that is inside. Apache registers itself with UFW to provide a few application profiles that can be used to enable or disable access.
List the ufw application profiles by running the following :
$ sudo ufw app list
$ sudo ufw allow 'Apache'
$ sudo ufw status
Output :
ramans@infodiginet:~$ sudo ufw app list
Available applications:
  Apache
  Apache Full
  Apache Secure
  CUPS
  OpenSSH
ramans@infodiginet:~$ sudo ufw allow 'Apache'
Rule added
Rule added (v6)
ramans@infodiginet:~$ sudo ufw status
Status: active
To                         Action      From
--                         ------      ----
443                        ALLOW       Anywhere
80/tcp                     ALLOW       Anywhere
5432/tcp                   ALLOW       Anywhere
Apache                     ALLOW       Anywhere
443 (v6)                   ALLOW       Anywhere (v6)
80/tcp (v6)                ALLOW       Anywhere (v6)
5432/tcp (v6)              ALLOW       Anywhere (v6)
Apache (v6)                ALLOW       Anywhere (v6)
Conclusion
In this short guidance, we have learned how to install Apache web server on Linux Ubuntu 22.04 LTS operating system.