How To Install Gunicorn On Ubuntu 22.04
In this short tutorial we will learn how to install Gunicorn on Ubuntu 22.04 LTS.
Introduction
Gunicorn, short for Green Unicorn, is a popular production-ready Python Web Server Gateway Interface (WSGI) HTTP server. It is designed to serve Python web applications efficiently and reliably, making it a valuable tool for deploying web applications in production environments. In this article, we’ll delve into the key features of Gunicorn, its benefits, and how to set it up for your Python web applications. Gunnicorn application can be found at https://gunicorn.org/.
Key Features of Gunicorn
- WSGI-Compatible: Gunicorn adheres to the WSGI specification, allowing it to serve any Python web application that follows the WSGI standard.
- Asynchronous Workers: Gunicorn uses asynchronous worker processes to handle multiple requests concurrently. This results in efficient resource utilization and improved performance.
- Pre-Forking Model: Gunicorn employs a pre-forking model where a master process manages multiple worker processes. This architecture enhances stability and reliability by isolating worker processes from each other.
- Graceful Worker Shutdown: Gunicorn gracefully handles worker shutdowns, ensuring that in-flight requests are completed before a worker process is terminated.
- Process Management: Gunicorn provides options to control the number of worker processes, worker type, and worker timeout.
- Logging and Debugging: Gunicorn offers extensive logging capabilities, helping administrators and developers diagnose issues in a production environment.
Benefits of Using Gunicorn
- High Performance: Gunicorn’s asynchronous workers and pre-forking model contribute to its high performance, making it suitable for serving production workloads.
- Scalability: You can scale your web application horizontally by adding more Gunicorn worker processes to handle increased traffic.
- Reliability: Gunicorn’s process isolation and graceful shutdown mechanisms ensure that one faulty worker process doesn’t affect others.
- Integration with Nginx: Gunicorn is often used in conjunction with a reverse proxy server like Nginx, which handles tasks like SSL termination and load balancing.
How To Install Gunicorn On Ubuntu 22.04
In this tutorial we will use Gunicorn version 20.1.0. to be installed on Ubuntu system. To install Gunicorn, we must already have Python installed on our system.
Prerequisites
Before installing Gunicorn on the system, we must already have :
- Ubuntu 22.04 LTS operating system
- Nginx installed on the system
- Python installed on the system
- A user with sudo privilege
If we have no Python on the system, just install it first. Python installation on Ubuntu 22.04 article has been discussed on How To Install Python 3.9 On Ubuntu 22.04 LTS tutorial.
Step 1: Update system
Before installing any new software, it’s a good practice to update the system packages. Open a terminal and run the following command:
$ sudo apt-get update
Step 2: Install: gunicorn Version 20.1.0
Ater updating the OS run following command to install the package by executing command line :
$ sudo apt-get install gunicorn
Output :
ramansah@infodiginet:~$ sudo apt-get install gunicorn
[sudo] password for ramansah:
Reading package lists... Done
Building dependency tree... Done
Reading state information... Done
The following additional packages will be installed:
python3-distutils python3-gunicorn python3-setuptools
Suggested packages:
python3-pastedeploy python3-setproctitle python3-tornado python-setuptools-doc
The following NEW packages will be installed:
gunicorn python3-distutils python3-gunicorn python3-setuptools
0 upgraded, 4 newly installed, 0 to remove and 169 not upgraded.
Need to get 549 kB of archives.
After this operation, 2.893 kB of additional disk space will be used.
Do you want to continue? [Y/n] Y
Get:1 http://id.archive.ubuntu.com/ubuntu jammy-updates/main amd64 python3-distutils all 3.10.8-1~22.04 [139 kB]
Get:2 http://id.archive.ubuntu.com/ubuntu jammy-updates/main amd64 python3-setuptools all 59.6.0-1.2ubuntu0.22.04.1 [339 kB]
Get:3 http://id.archive.ubuntu.com/ubuntu jammy/universe amd64 python3-gunicorn all 20.1.0-2 [58,4 kB]
Get:4 http://id.archive.ubuntu.com/ubuntu jammy/universe amd64 gunicorn all 20.1.0-2 [12,1 kB]
Fetched 549 kB in 1s (699 kB/s)
Selecting previously unselected package python3-distutils.
(Reading database ... 282187 files and directories currently installed.)
Preparing to unpack .../python3-distutils_3.10.8-1~22.04_all.deb ...
Unpacking python3-distutils (3.10.8-1~22.04) ...
Selecting previously unselected package python3-setuptools.
Preparing to unpack .../python3-setuptools_59.6.0-1.2ubuntu0.22.04.1_all.deb ...
Unpacking python3-setuptools (59.6.0-1.2ubuntu0.22.04.1) ...
Selecting previously unselected package python3-gunicorn.
Preparing to unpack .../python3-gunicorn_20.1.0-2_all.deb ...
Unpacking python3-gunicorn (20.1.0-2) ...
Selecting previously unselected package gunicorn.
Preparing to unpack .../gunicorn_20.1.0-2_all.deb ...
Unpacking gunicorn (20.1.0-2) ...
Setting up python3-distutils (3.10.8-1~22.04) ...
Setting up python3-setuptools (59.6.0-1.2ubuntu0.22.04.1) ...
Setting up python3-gunicorn (20.1.0-2) ...
Setting up gunicorn (20.1.0-2) ...
Processing triggers for man-db (2.10.2-1) ...
Step 3: Verify Installation
After installation is completed done, then we will verify it by querying its version.
$ gunicorn --version
Output :
ramansah@infodiginet:~$ gunicorn --version
gunicorn (version 20.1.0)
Step 4: Testing Gunicorn
After installing Gunicorn we will have access to the command line script gunicorn and we will try it.
Basic usage:
$ gunicorn [OPTIONS]:[WSGI_APP]
WSGI_APP is of the pattern $(MODULE_NAME):$(VARIABLE_NAME).
The module name can be a full dotted path.
The variable name refers to a WSGI callable that should be found in the specified module.
Example :
In this section, we will create a simple script to show how gunicorn is running. We will create a file called as : test_gunicorn01.py. By using any text editor we will append the script below.
$ vi test_gunicorn01.py
def aplikasi01(environ, start_response):
start_response("200 OK", [])
return iter([b"Hello World! This my first testing with gunicorn"])
We also need to configure Nginx webserver configuration as follow :
$ vi /etc/nginx/sites-available/infodiginet
server {
    listen 80;
    infodiginet infodiginet.com;

    location / {
    proxy_pass http://127.0.0.1:8000;
    proxy_set_header Host $host;
    proxy_set_header X-Real-IP $remote_addr;
    }
}
Running Gunicorn :
We will submit the command as suitable with the file which was already created.
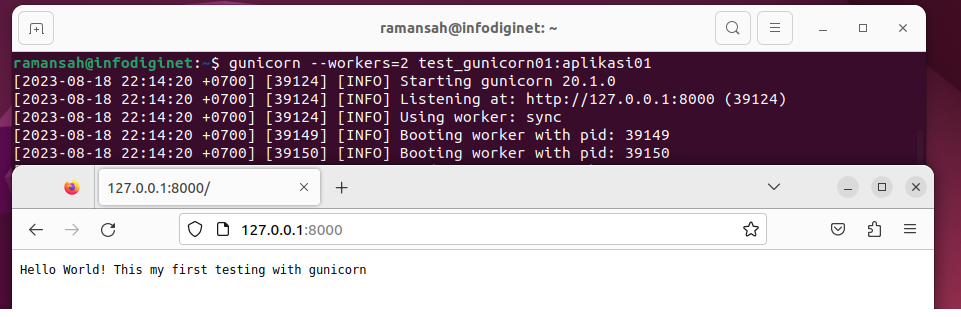
gunicorn --workers=2 test_gunicorn01:application01
Output :
ramansah@infodiginet:~$ gunicorn --workers=2 test_gunicorn01:aplikasi01
[2023-08-18 22:14:20 +0700] [39124] [INFO] Starting gunicorn 20.1.0
[2023-08-18 22:14:20 +0700] [39124] [INFO] Listening at: http://127.0.0.1:8000 (39124)
[2023-08-18 22:14:20 +0700] [39124] [INFO] Using worker: sync
[2023-08-18 22:14:20 +0700] [39149] [INFO] Booting worker with pid: 39149
[2023-08-18 22:14:20 +0700] [39150] [INFO] Booting worker with pid: 39150
Then, open a web browser to view what is happening. By submitting http://127.0.0.1:8000, we can see the page which was created.
Conclusion
Gunicorn is a reliable and performant choice for serving Python web applications in production. Its asynchronous workers, pre-forking model, and graceful shutdown capabilities make it well-suited for handling concurrent requests. By integrating Gunicorn with a reverse proxy like Nginx, we can create a robust and efficient deployment environment for your web applications.