How To Install SQLite On Ubuntu 24.04 Noble Numbat
In this short tutorial we will continue to learn how to install SQLite on Linux Ubuntu 24.04 operating system, code name as Noble Numbat.
SQLite Installation On Ubuntu 24.04
SQLite comes pre-installed on most Linux and macOS systems. For Windows, you can download the SQLite tools from the official SQLite website. There are several step to install SQLite on Ubuntu 24.04 as shown below :
- Update System repository
- Install SQLite3
- Using SQLite3
Before we are going to install a new packages, then we need to meet a prerequisites including SQLite3. Here is the prerequisites for this tutorial :
- System running Ubuntu 24.04 operating systems, It’s recommended that you use a fresh OS install to prevent any potential issues.
- Sufficient space.
- An active internet connection to download the necessary packages and dependencies.
- root access or a user with sudo privileges.
1. Update System Repository
Before installing new packages, it’s always a good practice to update your system’s repositories. This step is to ensure if the system is running on the secure and stable state. For this purpose we submit the command line :
$ sudo apt update
2. Installing SQLite 3
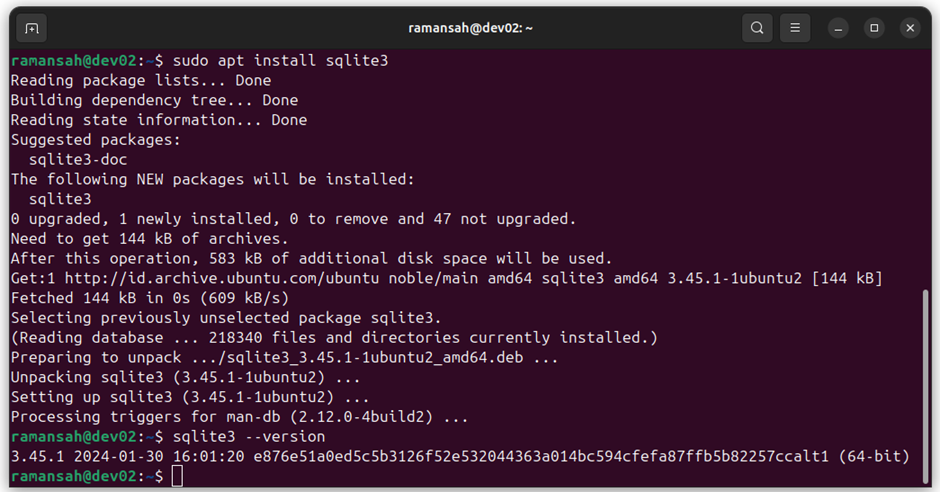
After we update the system repository, then we will install the SQLite3 by submitting command line :
$ sudo apt install sqlite3
Output :
ramansah@dev02:~$ sudo apt install sqlite3
Reading package lists... Done
Building dependency tree... Done
Reading state information... Done
Suggested packages:
  sqlite3-doc
The following NEW packages will be installed:
  sqlite3
0 upgraded, 1 newly installed, 0 to remove and 47 not upgraded.
Need to get 144 kB of archives.
After this operation, 583 kB of additional disk space will be used.
Get:1 http://id.archive.ubuntu.com/ubuntu noble/main amd64 sqlite3 amd64 3.45.1-1ubuntu2 [144 kB]
Fetched 144 kB in 0s (609 kB/s)
Selecting previously unselected package sqlite3.
(Reading database ... 218340 files and directories currently installed.)
Preparing to unpack .../sqlite3_3.45.1-1ubuntu2_amd64.deb ...
Unpacking sqlite3 (3.45.1-1ubuntu2) ...
Setting up sqlite3 (3.45.1-1ubuntu2) ...
Processing triggers for man-db (2.12.0-4build2) ...
After the installation was done, then we will verify it by querying SQLite version. For this purpose we will do following command line :
$ sqlite3 --version
Output :
ramansah@dev02:~$ sqlite3 --version
3.45.1 2024-01-30 16:01:20 e876e51a0ed5c5b3126f52e532044363a014bc594cfefa87ffb5b82257ccalt1 (64-bit)
3. Using SQLite3
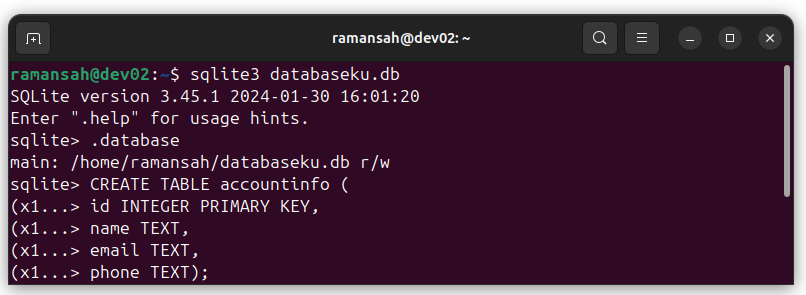
If we have installed SQLite, then we try to interact it SQLite. SQLite is equiped with a command-line interface (CLI) that allows you to interact with your database. To access the SQLite via CLI, we will submit the following command :
$ sqlite3
Output :
ramansah@dev02:~$ sqlite3
SQLite version 3.45.1 2024-01-30 16:01:20
Enter ".help" for usage hints.
Connected to a transient in-memory database.
At this tutorial we will create a simple database and create a table inside it then we insert and query the data from the table.
ramansah@dev02:~$ sqlite3 databaseku.db
SQLite version 3.45.1 2024-01-30 16:01:20
Enter ".help" for usage hints.
sqlite> .database
main: /home/ramansah/databaseku.db r/w
sqlite> CREATE TABLE accountinfo (
(x1...> id INTEGER PRIMARY KEY,
(x1...> name TEXT,
(x1...> email TEXT,
(x1...> phone TEXT);
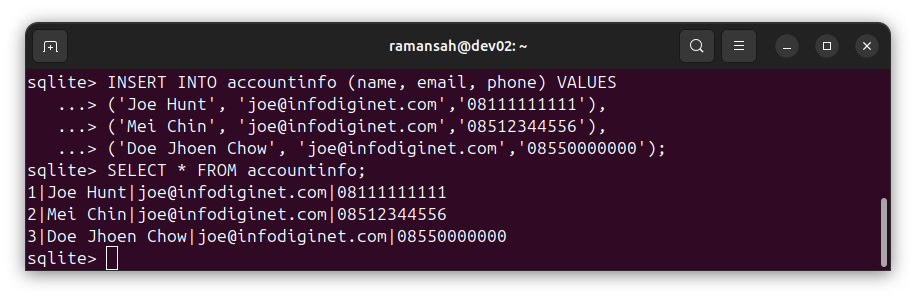
Insert data to table accountinfo on databasku.db, by submitting following command line :
sqlite> INSERT INTO accountinfo (name, email, phone) VALUES
   ...> ('Joe Hunt', 'joe@infodiginet.com','08111111111'),
   ...> ('Mei Chin', 'joe@infodiginet.com','08512344556'),
   ...> ('Doe Jhoen Chow', 'joe@infodiginet.com','08550000000');
Then select the data from table, by submitting command line :
sqlite> SELECT * FROM accountinfo;
1|Joe Hunt|joe@infodiginet.com|08111111111
2|Mei Chin|joe@infodiginet.com|08512344556
3|Doe Jhoen Chow|joe@infodiginet.com|08550000000
Conclusion
In this short tutorial we have learned how to install SQLite on Ubuntu 24.04 LTS Operating system and interact with it. We have created database, table, insert and query data from it.