How To Install Jenkins On CentOS 8 (Step-by-Step Guide)
In this short tutorial we will discuss how to install Jenkins on CentOS 8 operating system. Jenkins is free and the most popular open-source for automation server. It is used to automate the parts of software development related to building, testing, and deploying, facilitating continuous integration and continuous delivery (CI/CD) pipeline.
It supports version control tools, including AccuRev, CVS, Subversion, Git, Mercurial, Perforce, ClearCase and RTC, and can execute Apache Ant, Apache Maven and sbt based projects as well as arbitrary shell scripts and Windows batch commands.
Prerequisite
Before we start to install Jenkins, there are several prerequisites that must be met so that the installation process can run smoothly. We will need to prepare any requirements as mention below :
- root or user with sudo privileges account on CentOS 8
- Java installed on the system. Jenkins requires Java versions 8 and 11.
Jenkins requires Java to run properly on the system. We will ensure the java has been installed on the system by querying its version. If there is no java installed on our system then we must install it before continuing the next process.
$ java -version
Output :
[ramans@otodiginet ~]$ java -version
openjdk version "11.0.8" 2020-07-14 LTS
OpenJDK Runtime Environment 18.9 (build 11.0.8+10-LTS)
From the information above, we have had java 11.0.8 installed on the system.
Minimum hardware requirements:
- 256 MB of RAM
- 1 GB of drive space (although 10 GB is a recommended minimum if running Jenkins as a Docker container)
Recommended hardware configuration for a small team:
- 1 GB+ of RAM
- 50 GB+ of drive space
Jenkins Installation On CentOS 8
In this tutorial we will use Jenkins version 2.263 which was provided on Jenkins official website. The Jenkins Installation steps are as follow :
- Adding Jenkins repository and GPG key
- Install Jenkins
- Enabling Firewall fo Jenkins
- Setting Up Jenkins
The explanation of installation process will be discussed in several sub-chapters below.
1. Adding Jenkins Repository and GPG key
Jenkins is not included in the default CentOS software repositories, so we have to add the Jenkins repository to the system. For this purpose we will do the following commands line :
$ sudo wget -O /etc/yum.repos.d/jenkins.repo https://pkg.jenkins.io/redhat-stable/jenkins.repo
Output :
[ramans@otodiginet ~]$ sudo wget -O /etc/yum.repos.d/jenkins.repo https://pkg.jenkins.io/redhat-stable/jenkins.repo
[sudo] password for ramans:
--2020-12-22 18:58:03--  https://pkg.jenkins.io/redhat-stable/jenkins.repo
Resolving pkg.jenkins.io (pkg.jenkins.io)... 151.101.10.133, 2a04:4e42:2::645
Connecting to pkg.jenkins.io (pkg.jenkins.io)|151.101.10.133|:443... connected.
HTTP request sent, awaiting response... 200 OK
Length: 85
Saving to: ‘/etc/yum.repos.d/jenkins.repo’

/etc/yum.repos.d/jenkins. 100%[===================================>]      85  --.-KB/s    in 0s

2020-12-22 18:58:04 (1.56 MB/s) - ‘/etc/yum.repos.d/jenkins.repo’ saved [85/85]
Then we will verify the security key by submitting command line :
$ sudo rpm --import https://pkg.jenkins.io/redhat-stable/jenkins.io.key
2. Install Jenkins On CentOS 8
After all requirements and initial conditions have been met, then we will install Jenkins, by submitting following command lines.
$ sudo dnf update -y
$ sudo dnf install jenkins
Output :
[ramans@otodiginet ~]$ sudo dnf install jenkins
Jenkins-stable                                                         18 kB/s |  19 kB     00:01
Last metadata expiration check: 0:00:01 ago on Tue 22 Dec 2020 06:59:11 PM PST.
Dependencies resolved.
======================================================================================================
 Package                Architecture          Version                    Repository              Size
======================================================================================================
Installing:
 jenkins                noarch                2.263.1-1.1                jenkins                 64 M

Transaction Summary
======================================================================================================
Install  1 Package

Total download size: 64 M
Installed size: 64 M
Is this ok [y/N]: y
Downloading Packages:
jenkins-2.263.1-1.1.noarch.rpm                                         87 kB/s |  64 MB     12:30
------------------------------------------------------------------------------------------------------
Total                                                                  87 kB/s |  64 MB     12:30
Running transaction check
Transaction check succeeded.
Running transaction test
Transaction test succeeded.
Running transaction
  Preparing        :                                                                              1/1
  Running scriptlet: jenkins-2.263.1-1.1.noarch                                                   1/1
  Installing       : jenkins-2.263.1-1.1.noarch                                                   1/1
  Running scriptlet: jenkins-2.263.1-1.1.noarch                                                   1/1
  Verifying        : jenkins-2.263.1-1.1.noarch                                                   1/1
Installed products updated.

Installed:
  jenkins-2.263.1-1.1.noarch

Complete!
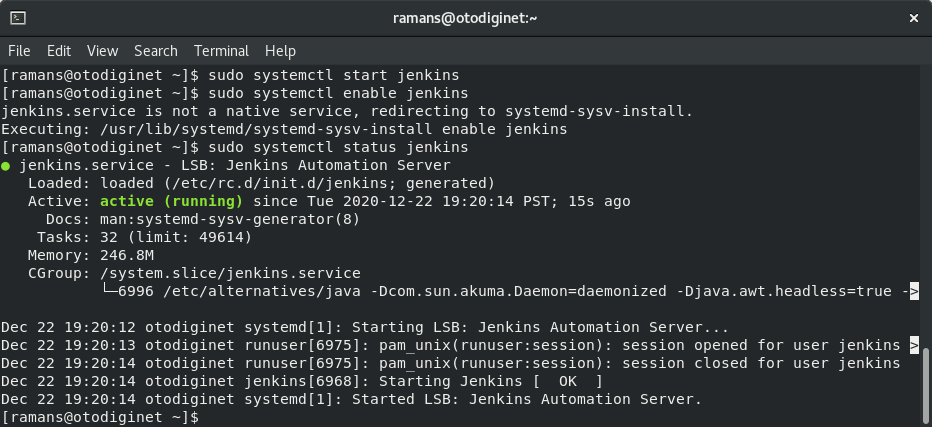
The Jenkins installation is completed done successfully, then we will startup the Jenkins service by submitting following commands line :
$ sudo systemctl start jenkins
$ sudo systemctl enable jenkins
$ sudo systemctl status jenkins
Output :
[ramans@otodiginet ~]$ sudo systemctl start jenkins
[ramans@otodiginet ~]$ sudo systemctl enable jenkins
jenkins.service is not a native service, redirecting to systemd-sysv-install.
Executing: /usr/lib/systemd/systemd-sysv-install enable jenkins
[ramans@otodiginet ~]$ sudo systemctl status jenkins
● jenkins.service - LSB: Jenkins Automation Server
   Loaded: loaded (/etc/rc.d/init.d/jenkins; generated)
   Active: active (running) since Tue 2020-12-22 19:20:14 PST; 15s ago
     Docs: man:systemd-sysv-generator(8)
    Tasks: 32 (limit: 49614)
   Memory: 246.8M
   CGroup: /system.slice/jenkins.service
           └─6996 /etc/alternatives/java -Dcom.sun.akuma.Daemon=daemonized -Djava.awt.headless=true ->

Dec 22 19:20:12 otodiginet systemd[1]: Starting LSB: Jenkins Automation Server...
Dec 22 19:20:13 otodiginet runuser[6975]: pam_unix(runuser:session): session opened for user jenkins >
Dec 22 19:20:14 otodiginet runuser[6975]: pam_unix(runuser:session): session closed for user jenkins
Dec 22 19:20:14 otodiginet jenkins[6968]: Starting Jenkins [  OK  ]
Dec 22 19:20:14 otodiginet systemd[1]: Started LSB: Jenkins Automation Server.
3. Setting Firewall
In this stage we will setup the firewall on CentOS 8 to allow Jenkins service can be accessed from the external entities.
$ sudo firewall-cmd --permanent --zone=public --add-port=8080/tcp
$ sudo firewall-cmd --reload
Output :

4. Setup Jenkins
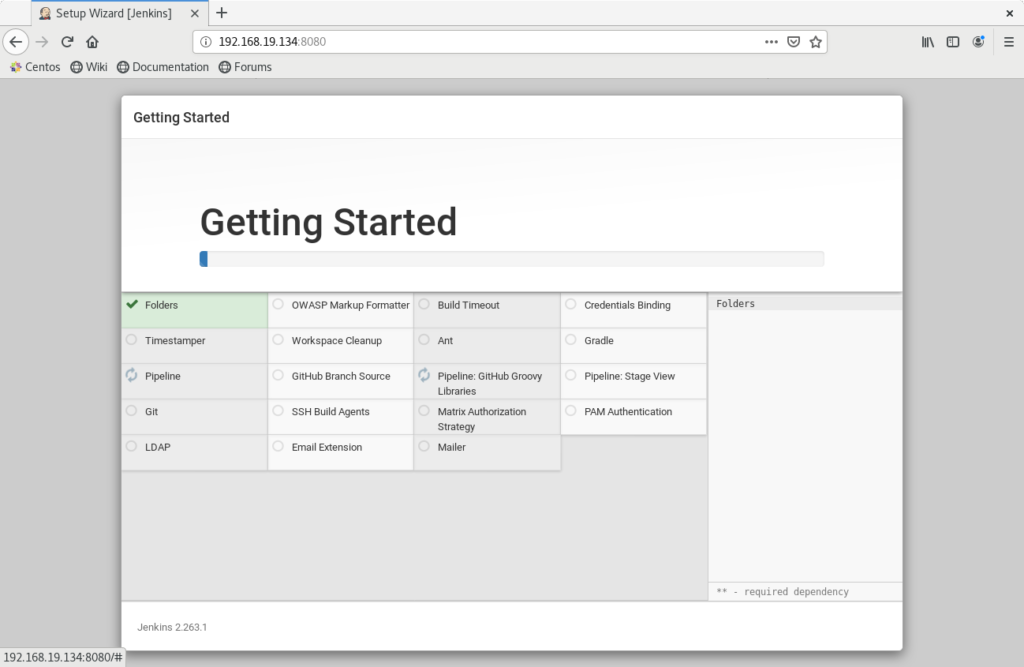
In this step, we assumed if our Jenkins installation was completed done. Then we will configure Jenkins to met with our requirements. The Jenkins setup will be handle with line. The Jenkins dashboard can be accessed via web browser with URL : http://<ip_address_or_hostname>:8080.
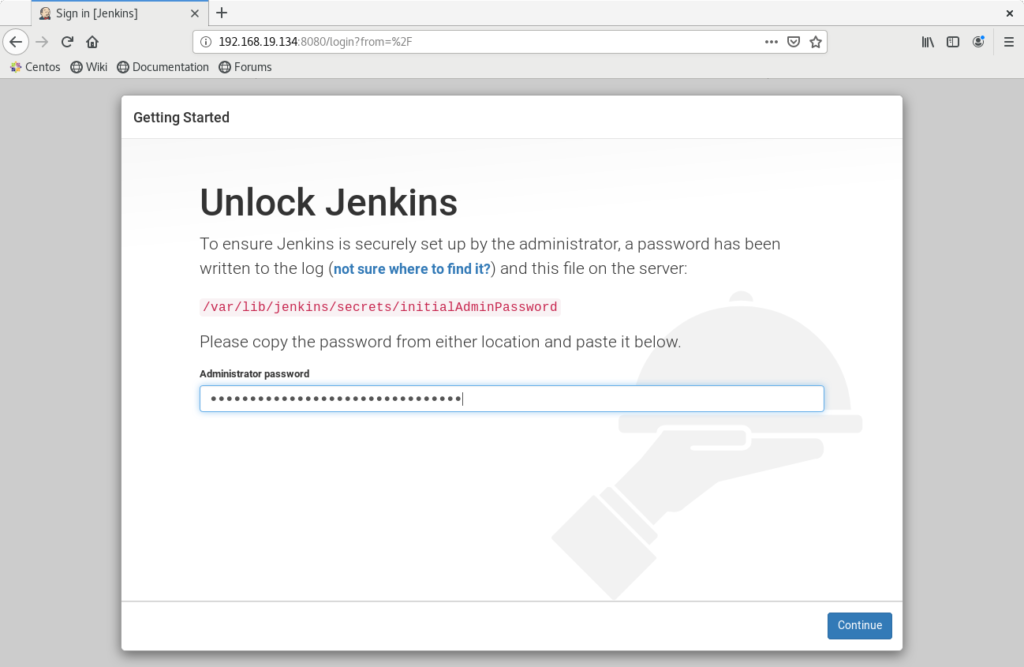
The username and password will be found at /var/lib/jenkins/secrets/initialAdminPassword file.
[ramans@otodiginet ~]$ sudo more /var/lib/jenkins/secrets/initialAdminPassword
[sudo] password for ramans:
d4ee060068484324ad56b73c0795ed66

Conclusion
In this short artcle, we have learned how to install Jenkins on Ubuntu 20.04 LTS and I hope this tutorial will be helpful.